
How to Protect Cells in Excel Workbooks —5 Easy Ways
This Protect Excel Workbook tutorial is suitable for users of Excel 2010/2013/2016/2019 and Microsoft 365.
Objective
Protect Excel Workbook, Worksheets, and protect cells in Excel to help maintain the integrity of the spreadsheet and reduce errors.
This guide covers:
Video Tutorial – Protect Cells in Excel
To see Cell, Sheet, and Workbook Protection in action, please watch the following video tutorial.
How to protect cells in Excel Explained
Imagine this scenario. You have spent weeks putting together a complex spreadsheet ensuring that the formulas work, it’s easy to update and nicely formatted. You share the spreadsheet with your team, and before you know it, mistakes have crept in, formulas have been accidentally edited or deleted, and links are broken. It is incredibly frustrating and creates unnecessary work for you as you attempt to rectify the mistakes.
Related:
Excel Templates For More Efficient Project Management
How to Use Excel COUNTIFS: The Best Guide
This can be avoided by the protect Excel workbook feature. Not only can you protect the entire worksheet, but even protect cells in Excel if you so desire. If people need to be able to edit certain cells or specific areas, that is no problem. You can define which parts of the workbook, worksheet, or cells to protect. Clever, isn’t it?
Protect cells in Excel – The Best Methods
Now, before we jump right into explaining how to protect an Excel workbook and also how to protect cells in Excel, we’ll break down this guide into simple steps for better understanding.
- Protect Excel Workbook with a password
- Protect Excel Workbook by read-only mode
- Protect Excel workbook using workbooks structure
- Protect Excel sheets
- Protect cells in Excel
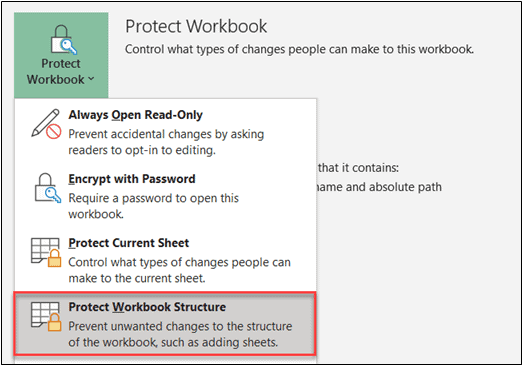
You have three options when it comes to protecting the entire workbook, including all worksheets contained within.
- You can encrypt it with a password to limit who can open it.
- You can make the file open as read-only by default so that people must opt into editing it.
- You can protect the structure of a workbook so that anyone can open it, but they need a password to delete, rearrange, rename, or create new worksheets.
Protect Excel Workbook by Encrypting with a Password
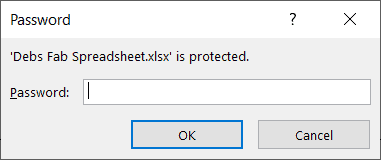
The highest level of protection is to encrypt the workbook with a password. On opening the workbook, it will prompt for the password and prevent anyone who does not have the password from accessing the file.
NOTE: Ensure that you make a note of the password. Once set, the password is not held anywhere and cannot be recovered if you forget it.
- Click on the File menu
- Click on the Info tab
- From the Protect Workbook drop-down, select Encrypt with Password
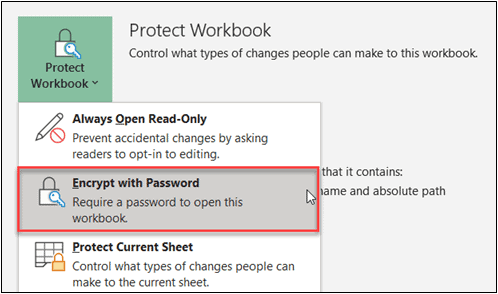
4. Enter a password to encrypt the contents of the file
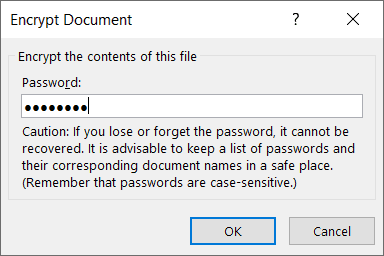
5. Confirm the password when prompted
Now, when you re-open the spreadsheet, you will be prompted to enter the password.
To remove the password protection from a workbook, open the workbook (which will require you to enter the password) and take the same steps you took to set the password. However, remove the password from the box, so it is blank and click ‘OK.’
Protect Excel Workbook with Open as Read-Only feature
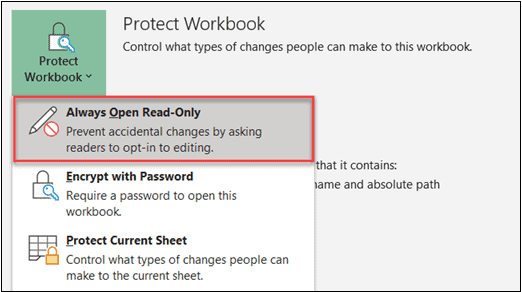
Your second option is to make a workbook read-only. The process is the simplest, but be aware that it provides the least amount of protection. Anyone can still open the workbook and just click ‘Enable Editing’ to make changes. It is best to look at this option as more of a warning to the person opening the file.
- Click the File menu
- Click the Info tab
- From the Protect Workbook drop-down, select Always Open Read-Only
Now, whenever you or anyone else opens the workbook, a warning bar will display across the top advising that the author has set the file to read-only to prevent accidental changes.
- Click the Edit Anyway button to proceed with making changes.

Also Read:
Excel SUMIFS & SUMIF Functions – The No.1 complete guide
5 Steps to Easily Use Excel 3D Maps (Bonus Video Included)
The Best Excel Project Management Template in 2021
Protect Excel Workbook with Workbooks Structure
The third way you can protect a workbook is by protecting the underlying structure. For example, without the password, a user cannot move, rename, delete, rearrange, or create new worksheets in the workbook. However, they can still make changes to the data in the workbook.
- Click the File menu
- Click the Info tab
- From the Protect Workbook drop-down, select Protect Workbook Structure
4. Type in a password and click OK.

Now, if you right-click on the worksheet tab, the options that allow you to change the structure of the workbook such as rename, move, or copy, delete, insert are greyed out.

If someone knows the password, they can go to the Review tab, click the Protect Workbook button, and enter the password to make those options accessible again.
Protecting a Worksheet
You can also protect an individual worksheet from editing. When you protect a sheet, Excel locks all cells and prevents them from being edited.
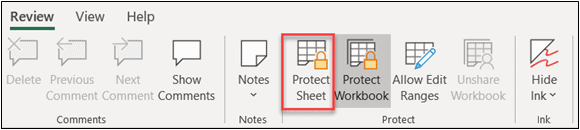
- Click the Review tab
- Click Protect Sheet
- Type a password
At this stage, you can select actions that you want to allow. In this example, I am going to allow users to make select cells and format rows and columns.

- Click OK
- Re-enter the password to confirm
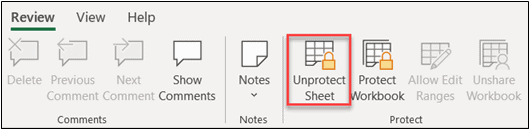
To unprotect a worksheet, click the Review tab and select Unprotect Sheet.
Protect Cells in Excel from Editing
Sometimes you might want to only protect cells in Excel from editing. For example, you might have a worksheet containing a mixture of input cells and formulas. You might wish for others to input figures into the input cells, but lock the cells containing the formulas.
How to protect cells in Excel like this? Let’s see with an example.
In this example, I want users to be able to change the cell containing the VAT rate, but not the formulas contained in the other cells.

- Select all the cells you DO NOT want to be locked
- Right-click and select Format Cells
- Click the Protection tab
By default, ALL cells in Excel are locked. The reason they do not appear to be locked when working in a spreadsheet is that the locking does not take effect until the spreadsheet is protected. Therefore, you will see a checkmark in the ‘Locked’ box.
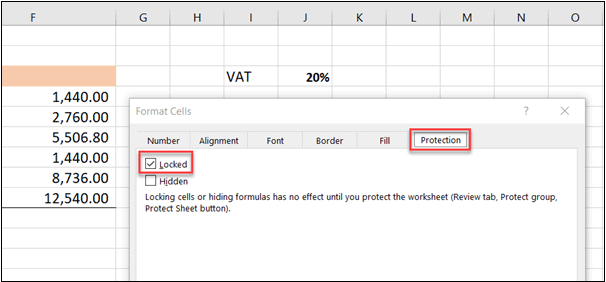
- Uncheck the Locked box
- Click OK
Now, the selected cells are essentially unlocked and all other cells in the spreadsheet are locked. To enforce this, you need to protect the worksheet.
- Click the Review tab
- Click Protect Sheet
That’s all, folks. We have covered everything about how to protect cells, worksheets, and workbooks in Excel in this guide. If you have any questions or clarifications, please ask them below in the comments section.
Suggested Reads:
Creating An Excel Dashboard In 5 Minutes
How to Make An Excel Forecast Sheet in 3 Steps – The Best Guide
Dynamic Arrays In Excel: Eight, Must-know Formulas
FAQs
How do I hide formulas in Excel?
When you protect formula cells in Excel, anyone can still see the formulas present in these locked cells. If you want them hidden, select all cells.
Go to the find & select button under the Editing tab
Click on the Go to special option under the drop-down arrow, and select formulas in the window.
Then, open the format cells dialogue box using the ribbon or by ctrl+1
Under the protection tab, select hidden & click ok
Now your formulas are hidden.
How do I restrict editing in Excel?
To restrict editing & other unwanted modification got to File—>Info—>protect Workbook
Under protect workbook select protect current sheet option.
Set a password & select the edits that are allowed to be made by others
Re-enter the password to confirm
Like what you see? Check out these links for more examples relating to protecting workbooks, worksheets, and cells.
Microsoft – Protect a Worksheet
Envatotuts+ – How to Protect Cells, Sheets, and Workbooks in Excel
For more Free Excel tutorials from Simon Sez IT. Take a look at our Excel Resource Center.
Other Excel classes you might like:
- Logical Functions in Excel
- Designing Better Spreadsheets in Excel
- Introduction to Power Pivot & Power Query in Excel
To learn Excel with Simon Sez IT. Take a look at the Excel courses we have available.
Deborah Ashby
Deborah Ashby is a TAP Accredited IT Trainer, specializing in the design, delivery, and facilitation of Microsoft courses both online and in the classroom.She has over 11 years of IT Training Experience and 24 years in the IT Industry. To date, she's trained over 10,000 people in the UK and overseas at companies such as HMRC, the Metropolitan Police, Parliament, SKY, Microsoft, Kew Gardens, Norton Rose Fulbright LLP.She's a qualified MOS Master for 2010, 2013, and 2016 editions of Microsoft Office and is COLF and TAP Accredited and a member of The British Learning Institute.
