Simon Sez IT

Online software training and video tutorials for Microsoft, Adobe & more

  • Course List
    • Adobe
      • Dreamweaver
        • Dreamweaver CC
        • Dreamweaver CS6
        • Dreamweaver CS5
        • Dreamweaver CS4
      • Flash
        • Flash CS5
      • InDesign
        • InDesign CS6
        • InDesign CS5
      • Photoshop
        • Photoshop CS6
        • Photoshop CS5
        • Adobe Photoshop CS4
      • Photoshop Elements
        • Photoshop Elements 2022
        • Photoshop Elements 2019
        • Photoshop Elements 2018
        • Photoshop Elements 15
        • Photoshop Elements 14
        • Photoshop Elements 13
        • Photoshop Elements 12
        • Photoshop Elements 11
        • Photoshop Elements 10
        • Photoshop Elements 9
        • Photoshop Elements 8
    • Microsoft
      • Access
        • Access 2021 Beginners
        • Access 2019
        • Access 2019 Advanced
        • Access 2016
        • Access 2016 Advanced
        • Access 2013
        • Access 2013 Advanced
        • Access 2010
        • Access 2010 Advanced
        • Access 2007
      • Excel
        • Data Analytics in Excel
        • Excel 2021 Advanced
        • Excel 2021 Intermediate
        • Excel 2021 Beginners
        • PivotTables for Beginners
        • Excel Dashboards
        • Advanced Formulas in Excel
        • Excel for Business Analysts
        • Advanced PivotTables
        • Power Pivot, Power Query and DAX in Excel
        • Excel 2019 Beginners (Mac)
        • Excel 2019 Beginners
        • Excel 2019 Advanced
        • Excel 2016 Beginners
        • Excel 2016 Intermediate
        • Excel 2016 Advanced
        • Excel 2013
        • Excel 2013 Advanced
        • Excel 2010 Beginners
        • Excel 2010 Advanced
        • Excel 2007
      • OneNote
        • OneNote Desktop and Windows 10
        • OneNote 2016
      • Outlook
        • Outlook 2021
        • Outlook 2019
        • Outlook 2016
        • Outlook 2013
        • Outlook 2010
        • Outlook 2007
      • Power Automate
        • Introduction to Power Automate
      • Power BI
        • Power BI
        • Power BI Intermediate
      • PowerPoint
        • PowerPoint 2021
        • PowerPoint 2019
        • PowerPoint 2016
        • PowerPoint 2013
        • PowerPoint 2010
        • PowerPoint 2007
      • Project
        • Project 2021 Beginners
        • Project for the Web
        • Project 2019
        • Project 2019 Advanced
        • Project 2016
        • Project 2016 Advanced
        • Project 2013
        • Project 2013 Advanced
        • Project 2010
        • Project 2010 Advanced
      • Publisher
        • Publisher 2013
      • SharePoint
        • SharePoint Online
        • SharePoint Foundation 2013
        • SharePoint Server 2013
        • SharePoint Foundation 2010
      • Teams
        • Microsoft Teams (2023 Update)
      • VBA
        • Macros and VBA for Beginners
        • VBA for Excel
        • VBA Intermediate Training
      • Visio
        • Microsoft Visio 2019
        • Visio 2016
        • Visio 2013
        • Microsoft Visio 2010
      • Windows
        • Windows 11 (2023 Update)
        • Windows 10 (2020 Update)
        • Windows 10
        • Windows 8
        • Windows 7
        • Windows Vista
      • Word
        • Word 2021
        • Word 2019 Advanced
        • Word 2019
        • Word 2016
        • Word 2013
        • Word 2010
        • Word 2007
    • QuickBooks
      • QuickBooks
        • QuickBooks Desktop Pro 2022
        • QuickBooks Pro 2021
        • QuickBooks Online Advanced
        • QuickBooks Online
        • QuickBooks Canada
        • QuickBooks Pro 2020
        • QuickBooks 2019
        • QuickBooks 2018
        • QuickBooks Pro 2017
        • QuickBooks Pro 2016
        • QuickBooks Pro 2015
        • QuickBooks Pro 2014
        • QuickBooks Pro 2013
        • QuickBooks Pro 2012
        • QuickBooks Pro 2011
        • QuickBooks Pro 2010
        • QuickBooks Pro 2009
    • Web Development
      • AngularJs
        • AngularJS Crash Course
      • Dreamweaver
        • Dreamweaver CC
        • Dreamweaver CS6
        • Dreamweaver CS5
        • Dreamweaver CS4
      • Bootstrap
        • Bootstrap Framework
      • Html/CSS
        • HTML/CSS Crash Course
        • HTML5 Essentials
      • Python
        • Python Object-Oriented Programming
        • Pandas for Beginners
        • Introduction to Python
      • Java
        • Java for Beginners
      • JavaScript
        • JavaScript for Beginners
        • jQuery Crash Course
      • MySql
        • MySQL for Beginners
      • PHP
        • PHP for Beginners
        • Advanced PHP Programming
      • XML
        • XML Crash Course
    • Data Analysis
      • Financial Modeling
        • Financial Risk Management
        • Financial Forecasting and Modeling
      • Data Analytics
        • Introduction to Analytics and Artificial Intelligence
        • Data Analytics in Excel
      • Alteryx
        • Alteryx Advanced
        • Introduction to Alteryx
      • Power BI
        • Power BI Intermediate
        • Power BI
      • Qlik Sense
        • Qlik Sense Advanced
        • Qlik Sense
      • R Programming
        • R Programming
      • Tableau
        • Tableau Desktop Advanced
        • Tableau Desktop
      • Python
        • Python Object-Oriented Programming
        • Pandas for Beginners
        • Introduction to Python
    • Work Productivity
      • Google Sheets
        • Google Sheets for Beginners
      • Confluence
        • Introduction to Confluence
      • Monday
        • Getting Started in Monday.com
      • Asana
        • Asana for Employees and Managers
        • Introduction to Asana
      • Jira
        • Getting Started in Jira
  • For Business
  • About Us
    • Testimonials
    • Contact Us
    • FAQ
    • Membership
    • About Us
  • Pricing
  • Free Resources
  • Sign In
  • Get Started
Home > Microsoft Excel > How to Insert a Checkbox in Excel? 3 EASY Examples

How to Insert a Checkbox in Excel? 3 EASY Examples

(Note: This tutorial on how to insert a checkbox in Excel is suitable for all Excel versions including Office 365.) 

A checkbox is a graphical tool to select or deselect a variable or an option. Surely you have come across checkboxes at least once over the internet. These are extensively used to create forms, checklists, and dynamic dashboards. 

How to Insert a Checkbox in Excel?

In this guide, I will teach you how to insert a checkbox in Excel, the easy way. I will also show you some interesting applications of checkboxes in Excel. 

Keep reading to learn the following:

  1. How to Activate the Developer Tab in Excel?
  2. How to Insert a Checkbox in Excel?
  3. How to Link a Checkbox to a Cell?
  4. How to Insert Multiple Check Boxes in Excel?
  5. How to Use Checkboxes in Excel? – Some Examples
    • How to Make an Interactive To Do List Using Check Boxes in Excel?
    • How to Make a Dynamic Chart Using Checkboxes in Excel?
    • How to Make a Dynamic Report in Using Checkboxes in Excel?

You can use these templates for free by clicking on the download button below.

Related:

How to Use the Chi Square Test Excel Function? 4 Easy Steps

The Excel SMALL Function – 3 Best Examples

How to Use e in Excel Using the EXP Function? 2 Easy Examples

How to Activate the Developer Tab in Excel? 

Before dealing with how to add checkboxes in Excel, you need to access the Excel Developer tab. But, it most likely won’t be activated in your copy of Excel by default. 

To activate it, right-click on any of the ribbon tabs and click on the Customize Ribbon button. 

Select the Customize Ribbon option

Now, the Excel Options dialog box will appear. Under it, inside the main tabs pane of the Customize the Ribbon section, click the checkmark next to the Developer option, then click OK.

Activate the Developer tab in the Excel Options dialog box

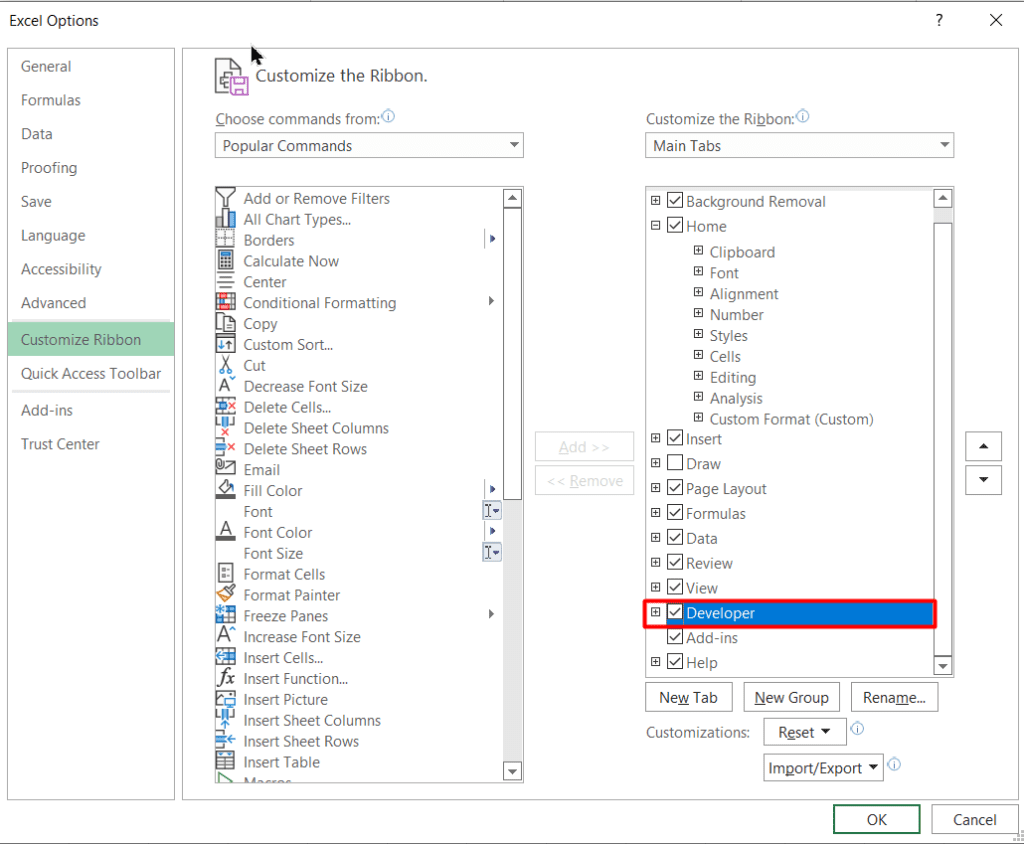
This will switch on the Developer tab in Excel. Now, we can use the developer tab to insert checkboxes in Excel. 

The Developer tab is activated in the Excel ribbon

Also Read:

How to Delete a Pivot Table in Excel? 4 Best Methods

How to Indent in Excel? 3 Easy Methods

How to Use the Format Painter Excel Feature? — 3 Bonus Tips

How to Insert a Checkbox in Excel?

To insert a checkbox in Excel, follow these steps:

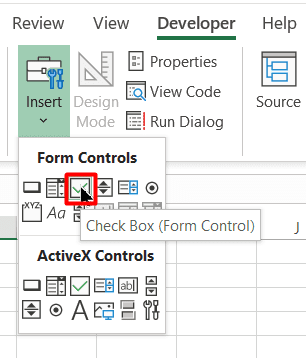
  1. Go to the Developer tab and click on the Insert button inside the Controls group. 
Select the Insert button inside the Controls group of the Developer tab
  1. In the Form Controls section of the drop-down menu, click on the Checkbox icon. 
Click on the Check Box icon under the Form Controls section
  1. Now, click on the cell where you need to insert the checkbox. This will insert a checkbox somewhere in the vicinity of that cell. 
Checkbox will appear somewhere near the cell
  1. Drag the checkbox to the exact desired location using the four-pointed arrow. You can access this by hovering over the check box with your mouse pointer. 
Drag the Checkbox using the four pointed arrow
How to insert a checkbox in Excel at a specific location? – Drag the checkbox using the four-pointed arrow
  1. All checkboxes in Excel come with a preset text “Check box 1”. To remove it, right-click on the text box and select the text. Now, you can either delete it or change it according to your preferences. 
Right-Click and delete the text
How to insert a checkbox in Excel without the preset text? – Right-Click and delete the text

Congratulations! You have successfully learnt how to insert a checkbox in Excel. In the next few sections, we will see how to insert multiple checkboxes and how to link them to other cells. 

How to Link a Checkbox to a Cell?

A checkbox in Excel will not work if it is not linked to another cell in the workbook. To link a checkbox to another cell, follow these steps:

  1. Right-click on the checkbox and click on the Format Control option.  
Right-click and select the Format Control option
How to insert a checkbox in Excel and link it to another cell? – Right-click and select the Format Control option
  1. Go to the Control tab of the Format Control dialog box and make these two changes:
  • Enter the fixed reference of the cell to be linked inside the Cell Link option. Alternatively, you can just click on the cell to be linked to automatically get the cell reference. 
  • Set the value to “Checked” to make sure that the checkbox is checked by default. 
Link the cell to the checkbox
Link the cell to the checkbox in the Control tab of the Format Control menu
  1. Click OK. 

This will link the checkbox to the specified cell. Now, if the checkbox is checked, the cell will display TRUE, if not, it will display FALSE. 

Checkbox is linked to another cell

How to Insert Multiple Check Boxes in Excel?

Now that we know how to insert a checkbox in Excel and link it to another cell, we will look into how to insert multiple checkboxes in Excel. 

We can do this in two ways. I’ll show them one by one. 

  1. Insert multiple checkboxes using the Developer Tab

This is the most obvious and straightforward method. Just keep repeating the same steps you used for adding a single checkbox as many times as you want. The problem is, it is very time-consuming.

You have to manually remove the caption names for each of these checkboxes and drag them to their proper location every time. 

  1. Copy and paste the checkboxes or drag them using the fill handle

You can simply copy and paste a checkbox to multiple cells as many times as you want. 

You can use the normal shortcuts Ctrl+C and Ctrl+V to do this. 

Alternatively, drag a checkbox down to other cells using the fill handle the same way you would drag a formula to other cells. 

How to insert multiple check boxes in Excel?
How to insert a checkboxe in Excel multiple times? – Use the fill handle

Please keep in mind, you have to manually change the linked cell reference for each copied checkbox. 

How to Use Checkboxes in Excel? – Some Examples

Excel checkboxes have a great set of interesting applications. With the help of checkboxes, you can create interactive to-do lists, dynamic charts, dynamic reports, etc. In this section, I’ll elaborate on each one of these techniques in a step-by-step manner. 

How to Make an Interactive To-Do List Using Check Boxes in Excel?

Look below for an example of an interactive to-do list in Excel. It keeps track of the percentage of tasks completed and updates their status in a visually intuitive way. 

To create such an interactive dashboard in Excel, follow these steps:

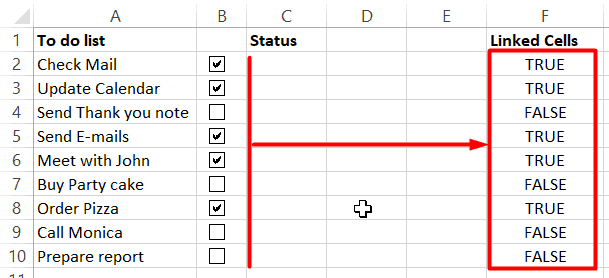
  1. Create a list of tasks for your to-do list and arrange them in a column (preferably column A, i.e A2:A10). 
  1. In the next adjacent column (column B, i.e B2:B10), add checkboxes to each of these tasks. 
  1. Manually link each of these checkboxes to a separate group of cells in another column (any non-adjacent column will do.In this example, F2:F10). 
Insert and link checkboxes to a separate group of cells
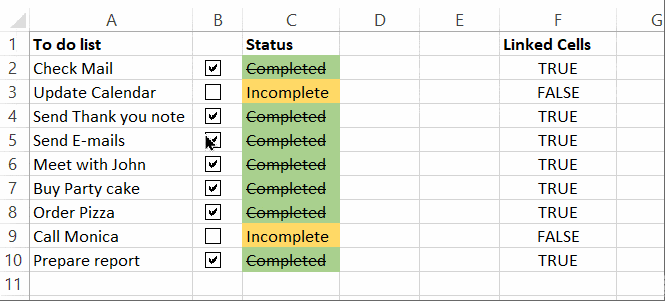
  1. In column C (i.e C2:C10), check the status of completion of each task using the checkbox-linked cells. To do this, use the formula =IF(F2,”Completed”,”Incomplete”) in cell C2 and drag it to the entire range of C2:C10 by using the fill handle. 
Add the status of completion of each task using an IF statement
  1. You can go the extra mile and apply conditional formatting to this range (C2:C10) to make it more visually appealing. For example, apply green colour to completed cells and amber colour to incomplete cells. 
Apply conditional formatting if required
  1. To calculate the number of tasks completed, use the formula =COUNTIF($F$2:$F$10, TRUE)
Calculate the number of tasks completed using the COUNTIF function
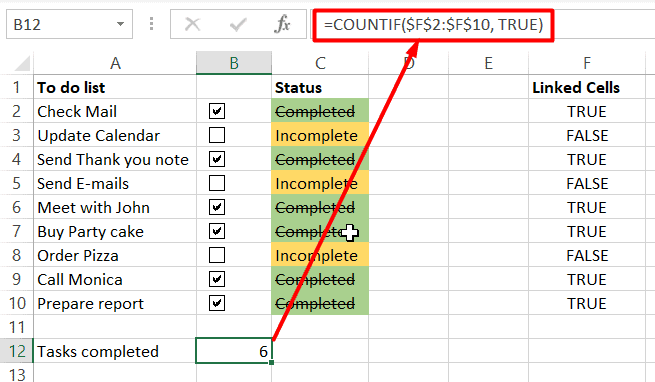
  1. Similarly, to calculate the % of tasks completed, use the formula =COUNTIF($F$2:$F$10,TRUE)/COUNTIF($F$2:$F$10,”<>”)
Find the percentage of completed tasks using a similar COUNTIF formula

How to Make a Dynamic Chart Using Checkboxes in Excel?

Imagine this for a second. You are presenting the annual and quarterly growth reports for the past three years to your team. You have created a stacked bar with a line chart to represent this. But, some of your teammates find it difficult to make sense of both years’ data at the same time.  

To solve this problem, you can create an interactive dynamic chart in Excel using checkboxes to selectively display a specific year’s data. 

Here’s how to do this:

  1. Add two checkboxes corresponding to the two years and link them to separate cells in a different range. 
Create checkboxes to controll the graph’s input data
  1. Using these linked cells as a reference criterion, copy only the data of the selected year, using an IF statement. 
Copy the source data to the Chart's input data using an IF statement based on the linked cells
Copy the source data to the Chart’s input data using an IF statement based on the linked cells
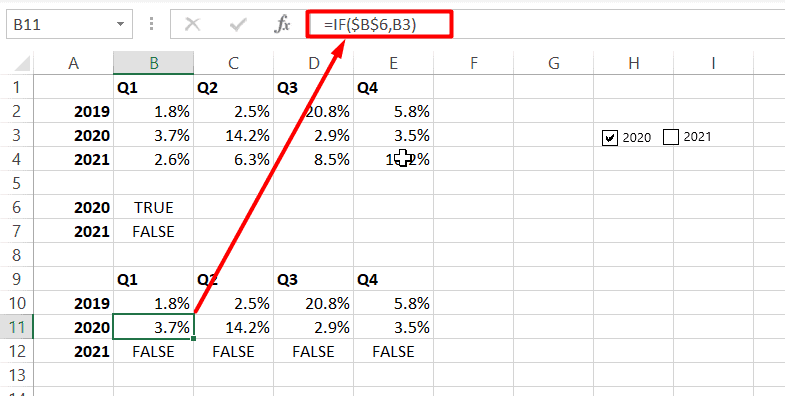
  1. Use this data to create a chart of your desired type and style. 
Use the new chart input data to create a suitable chart and use the checkboxes to toggle data on/off

Congratulations! You have successfully created an interactive chart using checkboxes in Excel. 

How to Make a Dynamic Report Using Checkboxes in Excel?

Let’s say for example you have a complex sales report, which summarizes the total sales revenue across regions for different months and quarters. To make it more presentable, you can add controls by using checkboxes to display only the selected regions’ data. 

To do this, follow these steps:

  1. Add checkboxes to the four regions or any other parameter and link them to another range of cells in the spreadsheet. 
Add Checkboxes and link them to separate range of cells
  1. Return the selected region names by using an IF condition, adjacent to the linked cells. 
Find the region names using the linked cells in the adjacent column
  1. Use the DSUM formula to find the sum and display the relevant data from the source data based on this criteria. 
Use the DSUM and DAVERAGE functions to calculate the total and average summary of the data

You have successfully created an interactive report in Excel by using checkboxes. 

Suggested Reads:

How to Make a Pareto Chart Excel Dashboard? 4 Easy Steps

How to Make a Sankey Diagram Excel Dashboard? A Step-by-Step Guide

How to Use the NPER Excel Formula: 2 Easy Examples

FAQs

How to make check boxes in Excel?

To insert check boxes in Excel, first activate the Developer tab and click on the Insert button in the Controls group. In the dropdown menu, click on the Checkbox icon under the Form Controls section.

How to delete checkbox in Excel?

Since there is no dedicated Excel delete checkbox feature, you have to delete them manually. To do this, select all the checkboxes you want to delete using the Ctrl key and hit Delete.

If you have too many checkboxes scattered around the worksheet, go to the Home tab, click on the Find & Select option and click on the Selection pane to find all of them in one place.

How to align checkboxes in Excel?

You have to manually align checkboxes in Excel using the four-pointed arrow. To access this, hover the mouse pointer over the checkbox and drag it to the desired location when the four-pointed arrow appears.

Let’s Wrapup

That’s all folks. In this guide, I have covered everything you need to know about how to insert a checkbox in Excel. I strongly recommend that you download the attached practice sheet and test these techniques out for yourself. If you face any problems or have any questions, please let us know in the comments section. 

Want more high-quality guides for Excel? Check out our free Excel resources centre. 

Click here to access in-depth Excel training courses and master in-demand advanced Excel skills. 


Simon Sez IT has been teaching critical IT software for over ten years. For a low, monthly fee you can get access to 100+ IT training courses by seasoned professionals.

Simon Calder

Chris “Simon” Calder was working as a Project Manager in IT for one of Los Angeles’ most prestigious cultural institutions, LACMA. He taught himself to use Microsoft Project from a giant textbook and hated every moment of it. Online learning was in its infancy then, but he spotted an opportunity and made an online MS Project course - the rest, as they say, is history!

Most Popular Posts

  • Kanban vs Scrum: Project Management Methodologies and Their Differences [2022]
  • How to Insert a Checkbox in Excel? 3 EASY Examples
  • How to Autofit Excel Cells? 3 Best Methods
  • XLOOKUP Google Sheets – 4 Best Alternatives!
  • Dashboards in Excel Using Pivot Tables, Pivot Charts and Slicers
  • Free Microsoft Project Training Course
  • Free Microsoft Access Tutorial for Beginners (3.5 Hours Video)
  • How to Use Blending Mode With Layers in Adobe Photoshop Elements 15

Similar Posts

How to Create Professional Documents in Microsoft Word – Recorded Webinar

Manually Manage Stacks in Photoshop Elements 10

How to Set Up Customers and Jobs in QuickBooks 2019

Logical Functions in Excel (IF, IFS, AND, OR, COUNTIF, SUMIF)

Using Backstage View in Access 2010

Exporting to Microsoft Excel in Project 2010

Course Categories

  • Adobe
  • Data Analysis
  • QuickBooks
  • Microsoft
  • Web Development
  • Work Productivity

About Us

  • About Us
  • Free Resources
  • Affiliates
  • Become an Instructor

Products

  • Pricing and Plans
  • Business Pricing
  • Government Discounts
  • Non-Profit Discounts

Support

  • FAQ’s
  • Contact Us
  • DVD support

Connect

YoutubeFacebookLinkedIn
© 2023 Simon Sez IT, Inc.
  • Terms
  • Privacy Policy
  • Sitemap
888.817.6665 Monday thru Friday 7:30 a.m. - 5:00 p.m. (ET)