Simon Sez IT

Online software training and video tutorials for Microsoft, Adobe & more

  • Course List
    • Adobe
      • Dreamweaver
        • Dreamweaver CC
        • Dreamweaver CS6
        • Dreamweaver CS5
        • Dreamweaver CS4
      • Flash
        • Flash CS5
      • InDesign
        • InDesign CS6
        • InDesign CS5
      • Photoshop
        • Photoshop CS6
        • Photoshop CS5
        • Adobe Photoshop CS4
      • Photoshop Elements
        • Photoshop Elements 2022
        • Photoshop Elements 2019
        • Photoshop Elements 2018
        • Photoshop Elements 15
        • Photoshop Elements 14
        • Photoshop Elements 13
        • Photoshop Elements 12
        • Photoshop Elements 11
        • Photoshop Elements 10
        • Photoshop Elements 9
        • Photoshop Elements 8
    • Microsoft
      • Access
        • Access 2021 Beginners
        • Access 2019
        • Access 2019 Advanced
        • Access 2016
        • Access 2016 Advanced
        • Access 2013
        • Access 2013 Advanced
        • Access 2010
        • Access 2010 Advanced
        • Access 2007
      • Excel
        • Data Analytics in Excel
        • Excel 2021 Advanced
        • Excel 2021 Intermediate
        • Excel 2021 Beginners
        • PivotTables for Beginners
        • Excel Dashboards
        • Advanced Formulas in Excel
        • Excel for Business Analysts
        • Advanced PivotTables
        • Power Pivot, Power Query and DAX in Excel
        • Excel 2019 Beginners (Mac)
        • Excel 2019 Beginners
        • Excel 2019 Advanced
        • Excel 2016 Beginners
        • Excel 2016 Intermediate
        • Excel 2016 Advanced
        • Excel 2013
        • Excel 2013 Advanced
        • Excel 2010 Beginners
        • Excel 2010 Advanced
        • Excel 2007
      • OneNote
        • OneNote Desktop and Windows 10
        • OneNote 2016
      • Outlook
        • Outlook 2021
        • Outlook 2019
        • Outlook 2016
        • Outlook 2013
        • Outlook 2010
        • Outlook 2007
      • Power Automate
        • Introduction to Power Automate
      • Power BI
        • Power BI
        • Power BI Intermediate
      • PowerPoint
        • PowerPoint 2021
        • PowerPoint 2019
        • PowerPoint 2016
        • PowerPoint 2013
        • PowerPoint 2010
        • PowerPoint 2007
      • Project
        • Project 2021 Beginners
        • Project for the Web
        • Project 2019
        • Project 2019 Advanced
        • Project 2016
        • Project 2016 Advanced
        • Project 2013
        • Project 2013 Advanced
        • Project 2010
        • Project 2010 Advanced
      • Publisher
        • Publisher 2013
      • SharePoint
        • SharePoint Online
        • SharePoint Foundation 2013
        • SharePoint Server 2013
        • SharePoint Foundation 2010
      • Teams
        • Microsoft Teams
      • VBA
        • Macros and VBA for Beginners
        • VBA for Excel
        • VBA Intermediate Training
      • Visio
        • Microsoft Visio 2019
        • Visio 2016
        • Visio 2013
        • Microsoft Visio 2010
      • Windows
        • Windows 11
        • Windows 10 (2020 Update)
        • Windows 10
        • Windows 8
        • Windows 7
        • Windows Vista
      • Word
        • Word 2021
        • Word 2019 Advanced
        • Word 2019
        • Word 2016
        • Word 2013
        • Word 2010
        • Word 2007
    • QuickBooks
      • QuickBooks
        • QuickBooks Desktop Pro 2022
        • QuickBooks Pro 2021
        • QuickBooks Online Advanced
        • QuickBooks Online
        • QuickBooks Canada
        • QuickBooks Pro 2020
        • QuickBooks 2019
        • QuickBooks 2018
        • QuickBooks Pro 2017
        • QuickBooks Pro 2016
        • QuickBooks Pro 2015
        • QuickBooks Pro 2014
        • QuickBooks Pro 2013
        • QuickBooks Pro 2012
        • QuickBooks Pro 2011
        • QuickBooks Pro 2010
        • QuickBooks Pro 2009
    • Web Development
      • AngularJs
        • AngularJS Crash Course
      • Dreamweaver
        • Dreamweaver CC
        • Dreamweaver CS6
        • Dreamweaver CS5
        • Dreamweaver CS4
      • Bootstrap
        • Bootstrap Framework
      • Html/CSS
        • HTML/CSS Crash Course
        • HTML5 Essentials
      • Python
        • Python Object-Oriented Programming
        • Pandas for Beginners
        • Introduction to Python
      • Java
        • Java for Beginners
      • JavaScript
        • JavaScript for Beginners
        • jQuery Crash Course
      • MySql
        • MySQL for Beginners
      • PHP
        • PHP for Beginners
        • Advanced PHP Programming
      • XML
        • XML Crash Course
    • Data Analysis
      • Financial Modeling
        • Financial Risk Management
        • Financial Forecasting and Modeling
      • Alteryx
        • Alteryx Advanced
        • Introduction to Alteryx
      • Power BI
        • Power BI Intermediate
        • Power BI
      • Qlik Sense
        • Qlik Sense Advanced
        • Qlik Sense
      • R Programming
        • R Programming
      • Tableau
        • Tableau Desktop Advanced
        • Tableau Desktop
      • Python
        • Python Object-Oriented Programming
        • Pandas for Beginners
        • Introduction to Python
    • Work Productivity
      • Google Sheets
        • Google Sheets for Beginners
      • Confluence
        • Introduction to Confluence
      • Monday
        • Getting Started in Monday.com
      • Asana
        • Asana for Employees and Managers
        • Introduction to Asana
      • Jira
        • Getting Started in Jira
  • For Business
  • About Us
    • Testimonials
    • Contact Us
    • FAQ
    • Membership
    • About Us
  • Pricing
  • Free Resources
  • Sign In
  • Get Started
Home > Microsoft Excel > How to Insert Multiple Rows in Excel? The 4 Best Methods

How to Insert Multiple Rows in Excel? The 4 Best Methods

Note: This guide on how to insert multiple rows in Excel is suitable for all Excel users. 

Have you ever wondered how to insert multiple rows in Excel in one go? In this tutorial, I am going to explain how to do just that. 

Also, I am going to talk about some lesser-known tricks and shortcuts about Excel rows. 

Related:

How to Autofit Excel Cells? 3 Best Methods

How to Shade Every Other Row in Excel? (5 Best Methods)

How to Superscript in Excel? (9 Best Methods)

I am confident that, by the end of this guide, you will be able to handle Excel rows like a pro. 

I’ll cover: 

  1. Why Insert Multiple Rows in Excel?
  2. How to Insert Multiple Rows in Excel? 
  3. Excel Insert Row Shortcut
  4. Excel Insert Row Shortcut for Tables
  5. How to Add a Row in-between Rows Multiple Times in Excel?

Why Insert Multiple Rows in Excel?

Many times, you will come across situations where you need to insert new rows of data into your spreadsheet. This will become strenuous and time-consuming even while using the Excel insert row shortcut. 

That’s when these techniques will come in handy, especially when you have too many important tasks on your plate. All the things I am going to cover will help you save time and use Excel effectively. 

How to Insert Multiple Rows in Excel? 

The easiest way to insert multiple rows in Excel is to use the Insert menu options. Follow these steps to do this: 

Step 1: Select the rows where you want to insert the new blank rows. To easily do this, just select the first few cells and

use the shortcut Shift + Space to select entire rows.

how to Insert multiple rows in Excel
Select the rows where you want to insert multiple new rows

Step 2: Click on the Insert icon in the Home tab. Another way to access the Insert icon is by 

right-clicking on the selection. 

Click on the Insert Icon
Click on the Insert icon in the Cells group under the Home tab
Right Click to access the insert icon
Another way to access the Insert option is to right-click on your selection

Excel will insert blank rows in place of the rows you just selected. 

Step 3: Now that you have the empty rows ready, fill in the relevant data inside them to 

complete the spreadsheet. 

Fill the inserted rows with relevant data

Also Read:

How to Use the Excel Fill Handle Easily? (Top 3 Uses with Examples)

How to Make a Line Graph in Excel? 4 Best Line Graph Examples

How to Group Worksheets in Excel? (In 3 Simple Steps)

Excel Insert Row Shortcut

The best way to fastly add multiple rows is to use keyboard shortcuts. They are: 

Step 1: Click and Select the Row cells where you want to add the new rows. Use Shift+Space. 

This will select the entire rows. 

Step 2: Press Alt+I

Step 3: Press Alt+R

That’s it. Excel will add multiple rows of blank data in the selected location. It is simple yet very effective. 

Do you want a simpler alternative shortcut? 

Just select the rows where you want to add new rows and click Ctrl plus “+”. 

Select the rows where you want to insert multiple rows and use Ctrl+”+” shortcut

Note: For some reason, this “+” has to be only from the keypad on your keyboard, for this to work properly. 

It cannot get simpler than this, isn’t it? 

Excel Insert Row Shortcut for Tables

Sometimes, you may need to add multiple rows, not for all columns but for a select data range. 

For example, in this case, I have a data range, which needs new rows to be added inside. But the problem here is that I have a separate set of data that is placed in an adjacent place on the worksheet. 

Now, If I add new columns for the entire worksheet range, it will affect the neighbouring data set as well. To avoid this, you need to convert your data range into a table before adding the rows. 

To do this, select the data range where you want to add multiple new rows and press “Ctrl+T”. This will convert your normal data into a table. 

Now, use Alt+H+I+A to add multiple rows at the place of your choice. The Ctrl plus “+”  option also works here. 

Convert your Data range into a Table using Ctrl+T and insert multiple rows at any place using Alt+H+I+A

How to Add a Row in-between Rows Multiple Times in Excel?

Let’s say, for example, I have a spreadsheet where I need to insert a row in between every two rows. 

To do this easily just select entire rows by clicking on the row number with “Ctrl” simultaneously. 

Then, simply click on the Insert button under the Home tab. 

Use Ctrl while selecting the rows and click Insert to add a row between two rows

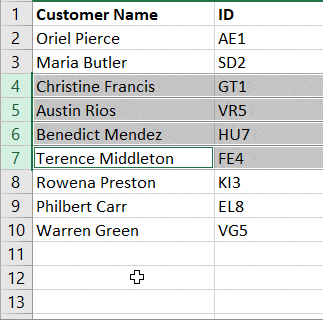
That’s it! Now Excel adds one empty row in between all the selected rows automatically. 

But, what if you need to add more than one row in between every two rows?

To do this you will need an additional column. 

In this additional column, assign serial numbers to all the rows in your data set. 

Add Serial Numbers in an adjacent Column

Next, copy the entire set of serial numbers and paste it at the end of the same column as many times as the number of rows you want to add. 

Paste the serial numbers below in the same column as many times as the number of rows you need to insert

Now, go to Sort and sort your data using the additional column in ascending order. You have successfully added more than one row in between every two rows. 

Select the entire data range and sort by the serial number from Smallest to Largest.

You can delete the additional column if needed. 

Suggested Reads:

How to Extract an Excel Substring? – 6 Best Methods

How to Split Cells in Excel? 3 Easy Methods

Easily Make a Bullet Chart in Excel—2 Examples

Closing Thoughts

These are all the different methods to insert multiple rows in Excel. If you have any questions about this or any other Excel feature, let us know in the comments. We are always happy to help. 

If you need more high-quality Excel guides, please check out our free Excel resources centre.

Simon Sez IT has been teaching Excel for over ten years. For a low, monthly fee you can get access to 100+ IT training courses. Click here for advanced Excel courses with in-depth training modules.

excel skills
Adam Lacey

Adam Lacey is an Excel enthusiast and online learning expert. He combines these two passions at Simon Sez IT where he wears a number of different hats. When Adam isn't fretting about site traffic or Pivot Tables, you'll find him on the tennis court or in the kitchen cooking up a storm.

Most Popular Posts

  • Kanban vs Scrum: Project Management Methodologies and Their Differences [2022]
  • How to Insert a Checkbox in Excel? 3 EASY Examples
  • How to Autofit Excel Cells? 3 Best Methods
  • XLOOKUP Google Sheets – 4 Best Alternatives!
  • Dashboards in Excel Using Pivot Tables, Pivot Charts and Slicers
  • Free Microsoft Project Training Course
  • Free Microsoft Access Tutorial for Beginners (3.5 Hours Video)
  • How to Use Blending Mode With Layers in Adobe Photoshop Elements 15

Similar Posts

More Tips with PowerPoint 2010 Shapes and Pictures

The Ribbon Is Large and in Charge in Excel 2013

Managing Users and Switching Accounts in Windows 8

Using Financial Functions in Microsoft Excel 2013

How to Split Cells Diagonally in Excel? 2 Easy Ways

Create Purchase Orders in QuickBooks 2019

Course Categories

  • Adobe
  • Data Analysis
  • QuickBooks
  • Microsoft
  • Web Development
  • Work Productivity

About Us

  • About Us
  • Free Resources
  • Affiliates
  • Become an Instructor

Products

  • Pricing and Plans
  • Business Pricing
  • Government Discounts
  • Non-Profit Discounts

Support

  • FAQ’s
  • Contact Us
  • DVD support

Connect

YoutubeFacebookLinkedIn
© 2023 Simon Sez IT, Inc.
  • Terms
  • Privacy Policy
  • Sitemap
888.817.6665 Monday thru Friday 7:30 a.m. - 5:00 p.m. (ET)