How to Split Cells in Excel? 3 Easy Methods
Note: This guide on how to split cells in Excel is suitable for all versions of Excel.
In your Excel journey, you will come across situations where you have to work with imported data. In these cases, it is very common to find cells of data that are not in the desired format.
For example, I have an Excel sheet, where a column of cells displays both the first and last names of customers together. But, I need to split the cells into two separate columns for the first and last names.
Related:
How To Find Duplicates In Excel? The Best Guide
Excel Goal Seek—the Easiest Guide (3 Examples)
Create A Pivot Table In Excel—the Easiest Guide
In other words, how to split cells across multiple columns?
In this guide, I’ll explain three easy ways to split cells in Excel with ample illustrations. You can watch this short video to easily learn how to split cells in Excel.
Please find below the sample Excel sheet to download and follow along with me.


You’ll learn:
- How to Split Cells in Excel Using Text to Column?
- How to Split Cells in Excel Using Text Functions?
- How to Split Cells Using Flash Fill (Auto Fill)?
- FAQs
How to Split Cells in Excel Using Text to Column?
One of the easiest ways to split cells is to use the text to column feature. To do this do the following:
- Select the column of cells you want to split. You can also select a specific range in a column.
- Locate and click on the Text to Columns button under the Data tab. It can be found in the Data Tools section.
- In the Convert Text to Columns Wizard, select the Delimited option as the data type.
Click Next.
- In the next window, select the Delimiters for splitting your cells. A delimiter is the character based on which the split should happen. In this case, the names have a space between them. Hence, the delimiter here is Space.
Also Read:
How To Use Excel Countifs: The Best Guide
Excel Conditional Formatting -the Best Guide (Bonus Video)
The Best Excel Project Management Template In 2021
Note that, any delimiter can be used if the data has it. If you are confused about which one to select, use trial and error to see how your split data appears in the Data preview window.
Click on Next.
- Now, choose your Data Type and Enter your Destination cell. In this example the destination cell is B2. keep in mind to leave sufficient space, especially if there are multiple delimiters in your data.
Click on Finish.
Congratulations, your cells have split into multiple cells. Keep in mind that this is not a dynamic feature. It means that any later change in the original names or data will not reflect in the result column.
How to Split Cells in Excel Using Text Functions?
Sometimes, you need a more robust solution to splitting cells. For example, the data may not contain a standard delimiter for you to choose. Or you may need to make the splitting process dynamic.
For such cases, use the Text functions to split the cells.
There are many text functions in Excel, but we don’t need all of them here. A few important ones are:
1. LEN – Returns the length of a string
2. RIGHT – Extract a specified number of characters from a String’s right end.
3. LEFT – Extract a specified number of characters from a String’s left end.
4. FIND – Look for a string inside another string.
5. SEARCH – Return the positions of a string inside another string
6. MID – Extract a specified number of characters from a String’s centre.
There is no one standard way to do this. You can use any combination of the above text functions to achieve your split.
Now, I’ll show you how to implement this using simple examples. Do the following:
- Determine the type of split you want in the data. I am using the same example, where the first names and last names are separated by a space.
- Now, to extract the first name, use a combination of SEARCH and LEFT functions.
Enter the formula =LEFT(A2,SEARCH(” “,A2)-1) in cell B2.
Here, the SEARCH looks for any space in the customer name and returns its position in the string. Then, the LEFT function extracts the part of the string from the left side, up to the position returned by the SEARCH function.


- Drag the formula to all the cells below.
You have successfully extracted the first names.
- Now, repeat the same process to extract the last names, except here, use the RIGHT function to extract from the end of the string.
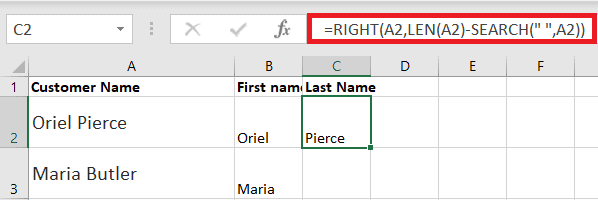
Enter the formula =RIGHT(A2,LEN(A2)-SEARCH(” “,A2)) in cell C2.
Here, the SEARCH looks for any space in the customer name and returns its position in the string. Then, the RIGHT function extracts the part of the string from the right side, up to the position, returned by the SEARCH function.


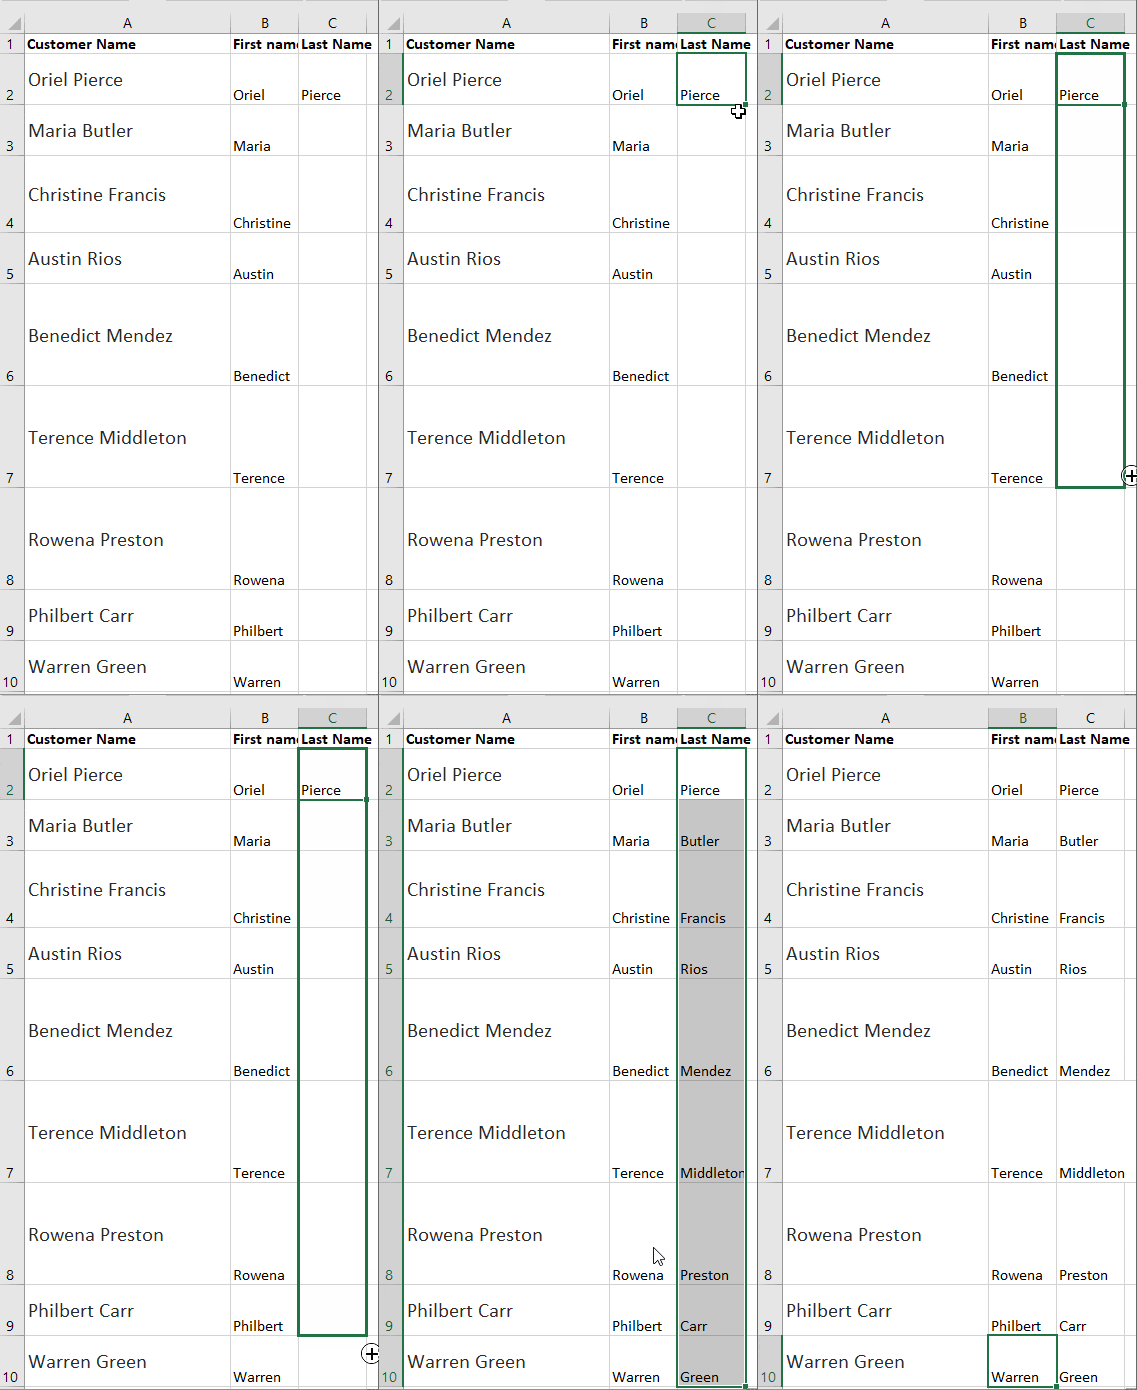
Drag the formula to all the cells below.


- Congratulations, you have successfully split the first and last names.
- The most important thing to note here is that the split is dynamic. That is, when you change the source data, the results also change automatically.


How to Split Cells Using Flash Fill (Auto Fill)?
Sometimes, you may want to split cells without using any formula or wizard menus.
To do this, use the Flash Fill feature to split cells instantly.
Follow these simple steps to accomplish this:
1. Type in the neighbouring cell, in the next column, an example of the split cell.
2. Drag the fill handle till the end of the data range.
3. Click on the AutoFill Options button at the end of the range and select Flash Fill


Now, Excel will recognize the pattern and will fill the remaining cells for you. Repeat the same process for the last names. You have successfully split the cells.
Suggested Reads:
Create An Excel Dashboard In 5 Minutes – The Best Guide
Dynamic Dropdown Lists In Excel – Top Data Validation Guide
Predict Future Values Using Excel Forecast Sheet – The Best Guide
FAQs
How to split cells in Excel to extract data?
You can split cells in Excel using these three methods.
1. Use the Text to Column feature to split cells with delimiter.
2. Use Text functions to split cells if you need a dynamic split.
3. Use Flash Fill in the Auto Fill feature to automatically split strings in cells.
Is there a split function in Excel?
Yes, there is a SPLIT function in Excel, which uses a delimiter to split strings into smaller sub strings.
Latest Posts
Easily Make a Bullet Chart in Excel—1 Bonus Video Included
Bar Graph in Excel — All 4 Types Explained Easily (Excel Sheet Included)
How to Easily Create an Excel Histogram?—2 Best Methods
Excel Quick Analysis Tool – The Best Guide (5 Examples)
How to Lock Cells in Excel?— 4 Best Methods with Examples
Let’s Wrap Up
In this guide, I have explained how to split cells in Excel in a step-by-step manner. I have covered all three important methods to split cells with detailed examples. If you have any doubts regarding splitting cells or any other Excel feature, please let us know in the comments below.
If you need more high-quality Excel guides, please check out our free Excel resources centre.
Simon Sez IT has been teaching Excel for over ten years. For a low, monthly fee you can get access to 100+ IT training courses. Click here for advance Excel courses with in-depth training modules.


