Simon Sez IT

Online software training and video tutorials for Microsoft, Adobe & more

  • Course List
    • Adobe
      • Dreamweaver
        • Dreamweaver CC
        • Dreamweaver CS6
        • Dreamweaver CS5
        • Dreamweaver CS4
      • Flash
        • Flash CS5
      • InDesign
        • InDesign CS6
        • InDesign CS5
      • Photoshop
        • Photoshop CS6
        • Photoshop CS5
        • Adobe Photoshop CS4
      • Photoshop Elements
        • Photoshop Elements 2022
        • Photoshop Elements 2019
        • Photoshop Elements 2018
        • Photoshop Elements 15
        • Photoshop Elements 14
        • Photoshop Elements 13
        • Photoshop Elements 12
        • Photoshop Elements 11
        • Photoshop Elements 10
        • Photoshop Elements 9
        • Photoshop Elements 8
    • Microsoft
      • Access
        • Access 2021 Beginners
        • Access 2019
        • Access 2019 Advanced
        • Access 2016
        • Access 2016 Advanced
        • Access 2013
        • Access 2013 Advanced
        • Access 2010
        • Access 2010 Advanced
        • Access 2007
      • Excel
        • Data Analytics in Excel
        • Excel 2021 Advanced
        • Excel 2021 Intermediate
        • Excel 2021 Beginners
        • PivotTables for Beginners
        • Excel Dashboards
        • Advanced Formulas in Excel
        • Excel for Business Analysts
        • Advanced PivotTables
        • Power Pivot, Power Query and DAX in Excel
        • Excel 2019 Beginners (Mac)
        • Excel 2019 Beginners
        • Excel 2019 Advanced
        • Excel 2016 Beginners
        • Excel 2016 Intermediate
        • Excel 2016 Advanced
        • Excel 2013
        • Excel 2013 Advanced
        • Excel 2010 Beginners
        • Excel 2010 Advanced
        • Excel 2007
      • OneNote
        • OneNote Desktop and Windows 10
        • OneNote 2016
      • Outlook
        • Outlook 2021
        • Outlook 2019
        • Outlook 2016
        • Outlook 2013
        • Outlook 2010
        • Outlook 2007
      • Power Automate
        • Introduction to Power Automate
      • Power BI
        • Power BI
        • Power BI Intermediate
      • PowerPoint
        • PowerPoint 2021
        • PowerPoint 2019
        • PowerPoint 2016
        • PowerPoint 2013
        • PowerPoint 2010
        • PowerPoint 2007
      • Project
        • Project 2021 Beginners
        • Project for the Web
        • Project 2019
        • Project 2019 Advanced
        • Project 2016
        • Project 2016 Advanced
        • Project 2013
        • Project 2013 Advanced
        • Project 2010
        • Project 2010 Advanced
      • Publisher
        • Publisher 2013
      • SharePoint
        • SharePoint Online
        • SharePoint Foundation 2013
        • SharePoint Server 2013
        • SharePoint Foundation 2010
      • Teams
        • Microsoft Teams
      • VBA
        • Macros and VBA for Beginners
        • VBA for Excel
        • VBA Intermediate Training
      • Visio
        • Microsoft Visio 2019
        • Visio 2016
        • Visio 2013
        • Microsoft Visio 2010
      • Windows
        • Windows 11
        • Windows 10 (2020 Update)
        • Windows 10
        • Windows 8
        • Windows 7
        • Windows Vista
      • Word
        • Word 2021
        • Word 2019 Advanced
        • Word 2019
        • Word 2016
        • Word 2013
        • Word 2010
        • Word 2007
    • QuickBooks
      • QuickBooks
        • QuickBooks Desktop Pro 2022
        • QuickBooks Pro 2021
        • QuickBooks Online Advanced
        • QuickBooks Online
        • QuickBooks Canada
        • QuickBooks Pro 2020
        • QuickBooks 2019
        • QuickBooks 2018
        • QuickBooks Pro 2017
        • QuickBooks Pro 2016
        • QuickBooks Pro 2015
        • QuickBooks Pro 2014
        • QuickBooks Pro 2013
        • QuickBooks Pro 2012
        • QuickBooks Pro 2011
        • QuickBooks Pro 2010
        • QuickBooks Pro 2009
    • Web Development
      • AngularJs
        • AngularJS Crash Course
      • Dreamweaver
        • Dreamweaver CC
        • Dreamweaver CS6
        • Dreamweaver CS5
        • Dreamweaver CS4
      • Bootstrap
        • Bootstrap Framework
      • Html/CSS
        • HTML/CSS Crash Course
        • HTML5 Essentials
      • Python
        • Python Object-Oriented Programming
        • Pandas for Beginners
        • Introduction to Python
      • Java
        • Java for Beginners
      • JavaScript
        • JavaScript for Beginners
        • jQuery Crash Course
      • MySql
        • MySQL for Beginners
      • PHP
        • PHP for Beginners
        • Advanced PHP Programming
      • XML
        • XML Crash Course
    • Data Analysis
      • Financial Modeling
        • Financial Risk Management
        • Financial Forecasting and Modeling
      • Alteryx
        • Alteryx Advanced
        • Introduction to Alteryx
      • Power BI
        • Power BI Intermediate
        • Power BI
      • Qlik Sense
        • Qlik Sense Advanced
        • Qlik Sense
      • R Programming
        • R Programming
      • Tableau
        • Tableau Desktop Advanced
        • Tableau Desktop
      • Python
        • Python Object-Oriented Programming
        • Pandas for Beginners
        • Introduction to Python
    • Work Productivity
      • Google Sheets
        • Google Sheets for Beginners
      • Confluence
        • Introduction to Confluence
      • Monday
        • Getting Started in Monday.com
      • Asana
        • Asana for Employees and Managers
        • Introduction to Asana
      • Jira
        • Getting Started in Jira
  • For Business
  • About Us
    • Testimonials
    • Contact Us
    • FAQ
    • Membership
    • About Us
  • Pricing
  • Free Resources
  • Sign In
  • Get Started
Home > Microsoft Project > Formatting Calendar View in Project 2010

Formatting Calendar View in Project 2010

Synopsis: In this article we look at how to format Calendar View in Project 2010.

Calendar View in Project 2010 resembles the equivalent view in MS Outlook in many ways. Here is an example using the default setup.


Facebook


Linkedin


Twitter

The user can choose between Month or Week views. In this case Month has been selected and the view shows 4 weeks that include most of Feb 2012. To show more or less weeks, click on Custom.

Use the spin buttons (or just edit in the text box) to increase the number of weeks from 4 to 6. Click OK.

It is now possible to see 6 weeks in view and all of February 2012. Switch to Week view by clicking Week.

This time we’ll customize the view by showing the last half of February 2012. ClickCustom. Use the lower section of this dialog to set the date range to Feb 15 2012 to Feb 29 2012
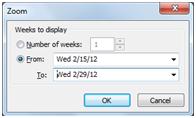
Click OK.

The full weeks that include the specified range of dates are now shown.

To maximize the use of space, select the Format tab. The ribbon contents should look like this.

Click Adjust Week Height. The view now shows a much longer time period.


Summary tasks are not shown by default in Calendar View. To view them, click Bar Styles and you will see the Bar Style dialog.


Select Summary in the list of task types and then Line for the Bar type. Leave the color as black and the dialog now looks like this.


Click OK.


The summary tasks are now shown as lines with text embedded in them. Where multiple tasks appear on the same day you will see a small black arrow in the top left corner of the day. Notice the one on Mar 2 2012.

Click on the arrow and a list of the tasks scheduled for that day appears, as shown here.


Although you can’t change the formatting of individual entries, you can change styles as with other graphical views in Project 2010. The leftmost command on the Format tab is Text Styles. Click that and the Text Styles dialog appears. You can choose an entry from the Item to Change dropdown list and format its text as required. You can change font, font size and color, etc.


When you have made any changes, click OK to confirm them.

Similarly, you can use the Bar Styles command that we have already seen to change the way that any of the specified items appear in Calendar View.

Another feature that can help when customizing Calendar View is the Gridlines command. Select this and the Gridlines dialog appears.


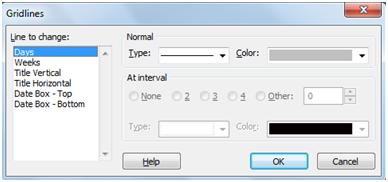
Let’s change the line between Days. Select Days as the Line to change and then click the dropdown arrow next to Type.


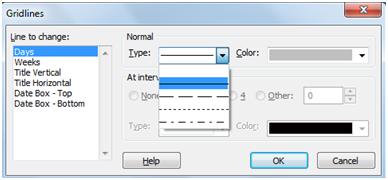
Select the bottom (dash dot) type and a color of black and click OK.

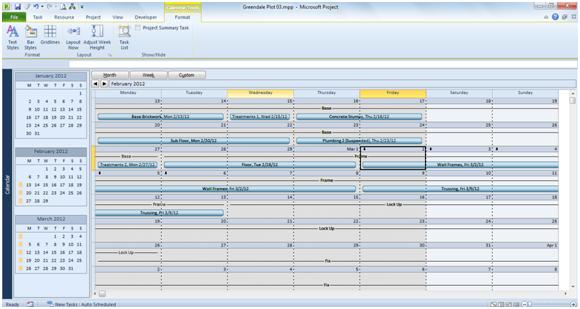
Calendar View now looks like this.


And finally, you can easily change which fields are shown in each bar using the Bar Styles dialog. Click Bar Styles on the Format tab. Select Critical as the Task Type. Now click the dropdown arrow next to Field(s).


You are offered a full list of the available fields that can be shown in the bar. Select the ones you want to show by using the check boxes. I’ve selected Start as well as Name. Click OK.


Now the bar for each critical task includes both the task name and the start date.


Simon Calder

Chris “Simon” Calder was working as a Project Manager in IT for one of Los Angeles’ most prestigious cultural institutions, LACMA. He taught himself to use Microsoft Project from a giant textbook and hated every moment of it. Online learning was in its infancy then, but he spotted an opportunity and made an online MS Project course - the rest, as they say, is history!

Most Popular Posts

  • Kanban vs Scrum: Project Management Methodologies and Their Differences [2022]
  • How to Insert a Checkbox in Excel? 3 EASY Examples
  • How to Autofit Excel Cells? 3 Best Methods
  • XLOOKUP Google Sheets – 4 Best Alternatives!
  • Dashboards in Excel Using Pivot Tables, Pivot Charts and Slicers
  • Free Microsoft Project Training Course
  • Free Microsoft Access Tutorial for Beginners (3.5 Hours Video)
  • How to Use Blending Mode With Layers in Adobe Photoshop Elements 15

START LEARNING Formatting Calendar View in Project 2010 ON SIMONSEZIT.COM

START MY MEMBERSHIP

Similar Posts

Using the Tell Me Feature in Microsoft Excel 2016

Inserting Pictures in PowerPoint 2016

Workbook Views and Using the Zoom Feature in Microsoft Excel 2016

How to Superscript in PowerPoint? (And Subscript) 3 Easy Ways

Reconcile Bank Accounts in Quickbooks 2019

The Publisher 2013 Interface: Navigating the Ribbon

Course Categories

  • Adobe
  • Data Analysis
  • QuickBooks
  • Microsoft
  • Web Development
  • Work Productivity

About Us

  • About Us
  • Free Resources
  • Affiliates
  • Become an Instructor

Products

  • Pricing and Plans
  • Business Pricing
  • Government Discounts
  • Non-Profit Discounts

Support

  • FAQ’s
  • Contact Us
  • DVD support

Connect

YoutubeFacebookLinkedIn
© 2023 Simon Sez IT, Inc.
  • Terms
  • Privacy Policy
  • Sitemap
888.817.6665 Monday thru Friday 7:30 a.m. - 5:00 p.m. (ET)