Simon Sez IT

Online software training and video tutorials for Microsoft, Adobe & more

  • Course List
    • Adobe
      • Dreamweaver
        • Dreamweaver CC
        • Dreamweaver CS6
        • Dreamweaver CS5
        • Dreamweaver CS4
      • Flash
        • Flash CS5
      • InDesign
        • InDesign CS6
        • InDesign CS5
      • Photoshop
        • Photoshop CS6
        • Photoshop CS5
        • Adobe Photoshop CS4
      • Photoshop Elements
        • Photoshop Elements 2022
        • Photoshop Elements 2019
        • Photoshop Elements 2018
        • Photoshop Elements 15
        • Photoshop Elements 14
        • Photoshop Elements 13
        • Photoshop Elements 12
        • Photoshop Elements 11
        • Photoshop Elements 10
        • Photoshop Elements 9
        • Photoshop Elements 8
    • Microsoft
      • Access
        • Access 2021 Beginners
        • Access 2019
        • Access 2019 Advanced
        • Access 2016
        • Access 2016 Advanced
        • Access 2013
        • Access 2013 Advanced
        • Access 2010
        • Access 2010 Advanced
        • Access 2007
      • Excel
        • Data Analytics in Excel
        • Excel 2021 Advanced
        • Excel 2021 Intermediate
        • Excel 2021 Beginners
        • PivotTables for Beginners
        • Excel Dashboards
        • Advanced Formulas in Excel
        • Excel for Business Analysts
        • Advanced PivotTables
        • Power Pivot, Power Query and DAX in Excel
        • Excel 2019 Beginners (Mac)
        • Excel 2019 Beginners
        • Excel 2019 Advanced
        • Excel 2016 Beginners
        • Excel 2016 Intermediate
        • Excel 2016 Advanced
        • Excel 2013
        • Excel 2013 Advanced
        • Excel 2010 Beginners
        • Excel 2010 Advanced
        • Excel 2007
      • OneNote
        • OneNote Desktop and Windows 10
        • OneNote 2016
      • Outlook
        • Outlook 2021
        • Outlook 2019
        • Outlook 2016
        • Outlook 2013
        • Outlook 2010
        • Outlook 2007
      • Power Automate
        • Introduction to Power Automate
      • Power BI
        • Power BI
        • Power BI Intermediate
      • PowerPoint
        • PowerPoint 2021
        • PowerPoint 2019
        • PowerPoint 2016
        • PowerPoint 2013
        • PowerPoint 2010
        • PowerPoint 2007
      • Project
        • Project 2021 Beginners
        • Project for the Web
        • Project 2019
        • Project 2019 Advanced
        • Project 2016
        • Project 2016 Advanced
        • Project 2013
        • Project 2013 Advanced
        • Project 2010
        • Project 2010 Advanced
      • Publisher
        • Publisher 2013
      • SharePoint
        • SharePoint Online
        • SharePoint Foundation 2013
        • SharePoint Server 2013
        • SharePoint Foundation 2010
      • Teams
        • Microsoft Teams (2023 Update)
      • VBA
        • Macros and VBA for Beginners
        • VBA for Excel
        • VBA Intermediate Training
      • Visio
        • Microsoft Visio 2019
        • Visio 2016
        • Visio 2013
        • Microsoft Visio 2010
      • Windows
        • Windows 11 (2023 Update)
        • Windows 10 (2020 Update)
        • Windows 10
        • Windows 8
        • Windows 7
        • Windows Vista
      • Word
        • Word 2021
        • Word 2019 Advanced
        • Word 2019
        • Word 2016
        • Word 2013
        • Word 2010
        • Word 2007
    • QuickBooks
      • QuickBooks
        • QuickBooks Desktop Pro 2022
        • QuickBooks Pro 2021
        • QuickBooks Online Advanced
        • QuickBooks Online
        • QuickBooks Canada
        • QuickBooks Pro 2020
        • QuickBooks 2019
        • QuickBooks 2018
        • QuickBooks Pro 2017
        • QuickBooks Pro 2016
        • QuickBooks Pro 2015
        • QuickBooks Pro 2014
        • QuickBooks Pro 2013
        • QuickBooks Pro 2012
        • QuickBooks Pro 2011
        • QuickBooks Pro 2010
        • QuickBooks Pro 2009
    • Web Development
      • AngularJs
        • AngularJS Crash Course
      • Dreamweaver
        • Dreamweaver CC
        • Dreamweaver CS6
        • Dreamweaver CS5
        • Dreamweaver CS4
      • Bootstrap
        • Bootstrap Framework
      • Html/CSS
        • HTML/CSS Crash Course
        • HTML5 Essentials
      • Python
        • Python Object-Oriented Programming
        • Pandas for Beginners
        • Introduction to Python
      • Java
        • Java for Beginners
      • JavaScript
        • JavaScript for Beginners
        • jQuery Crash Course
      • MySql
        • MySQL for Beginners
      • PHP
        • PHP for Beginners
        • Advanced PHP Programming
      • XML
        • XML Crash Course
    • Data Analysis
      • Financial Modeling
        • Financial Risk Management
        • Financial Forecasting and Modeling
      • Data Analytics
        • Introduction to Analytics and Artificial Intelligence
        • Data Analytics in Excel
      • Alteryx
        • Alteryx Advanced
        • Introduction to Alteryx
      • Power BI
        • Power BI Intermediate
        • Power BI
      • Qlik Sense
        • Qlik Sense Advanced
        • Qlik Sense
      • R Programming
        • R Programming
      • Tableau
        • Tableau Desktop Advanced
        • Tableau Desktop
      • Python
        • Python Object-Oriented Programming
        • Pandas for Beginners
        • Introduction to Python
    • Work Productivity
      • Google Sheets
        • Google Sheets for Beginners
      • Confluence
        • Introduction to Confluence
      • Monday
        • Getting Started in Monday.com
      • Asana
        • Asana for Employees and Managers
        • Introduction to Asana
      • Jira
        • Getting Started in Jira
  • For Business
  • About Us
    • Testimonials
    • Contact Us
    • FAQ
    • Membership
    • About Us
  • Pricing
  • Free Resources
  • Sign In
  • Get Started
Home > Microsoft Excel > How to Wrap Text in Excel? With 6 Simple Methods

How to Wrap Text in Excel? With 6 Simple Methods

(Note: This guide on how to wrap text in Excel is suitable for all versions including Office 365)

Microsoft Excel is designed primarily to store numbers. Sometimes, a large amount of text needs to be stored in spreadsheets. You have to make the column wider if the text is long and does not fit into a cell. Ideally, it is not the best way when you work with a large spreadsheet.

You can find this option in the Home tab’s ribbon. You find the Wrap Text option in the Alignment group. Select the text that you want to wrap and click on the Wrap Text button.

You’ll Learn:

  • Method 1: Wrap Text from Ribbon
  • Method 2: Wrap Text by Adjusting the Column Width
  • Method 3: Wrap Text Using Keyboard Shortcut
  • Method 4: Wrap Text Using the Format Cells Dialog Box
  • Method 5: Automatically Adjust Column Width to Fit Text
  • Method 6: Manually Add Line Breaks to Wrap the Text
  • Remove Formatting
  • Remove the Break Lines
Wrap Text in Excel - Text is truncated if there's no space or the next cell is occupied
Wrap Text in Excel – Text is truncated if there’s no space or the next cell is occupied

Excel provides a better solution by wrapping text that exceeds a column width. If the text is too long to fit into a cell, Excel will adjust automatically the text to appear on multiple cells. This won’t change the data and no line break characters will be inserted. The wrapped data will appear on multiple lines.

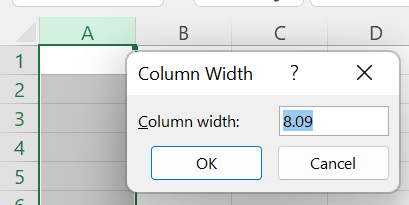
By default, the cell’s column width is 8.09 points. You can increase the column width to accommodate the long sentence. You can wrap the text in Excel so that it fits within the cell by increasing the cell’s height.

Default Column Width

In this article, we will learn how to wrap text so that it fits inside the cell of an Excel spreadsheet.

download wrap text worksheet

Method 1: Wrap Text in Excel from Ribbon

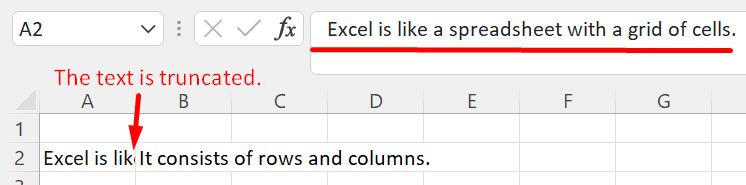
When you enter a long text in Excel, the text doesn’t cut off, rather it extends and occupies the cells next to it. 

Wrap Text in Excel from Ribbon

Select the cell that has the text to wrap and then click on the Home tab. In the Alignment group, select the Wrap Text option in the ribbon. After the Wrap Text option is applied to the text, you find that the row height has adjusted to fit all the text.

Wrapped Text
Wrapped Text

Related Reads:

  • How to Convert XML to Excel? – 2 Easy Methods 
  • How to Use the PROPER Function in Excel? 3 Easy Examples
  • Scientific Notation in Excel – A Step-by-Step Guide

Method 2: Wrap Text by Adjusting the Column Width

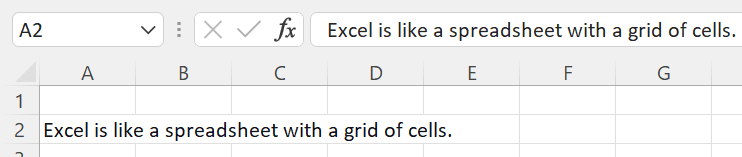
Instead of adjusting the row height, you can adjust the width of the column by placing the cursor at the boundary of the cell and dragging it so that it accommodates the entire text. 

Wrap text by adjusting the column width

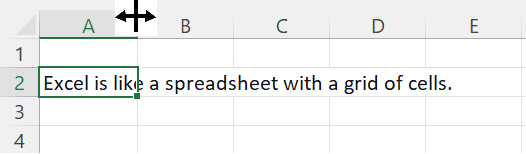
When you place the cursor on the cell, you see the symbol .  Drag it to the end of the text and notice that cell A has occupied more space to contain the text.

Wrapped Text

Method 3: Wrap Text Using Keyboard Shortcut

A simple method to wrap text in Excel is by pressing the Alt -> H -> W keys on your keyboard. The Alt keys are found on either side of your space bar. 

Method 4: Wrap Text Using the Format Cells Dialog Box

The Format Cells dialog box allows you to customize the look and feel of the table or the spreadsheet. Select the cell and right-click on it, you get a list of options to choose from. Choose Format Cells that contain the formatting options to apply on the cell in your spreadsheet, including the wrap text options.

Wrap text using format cells dialog box

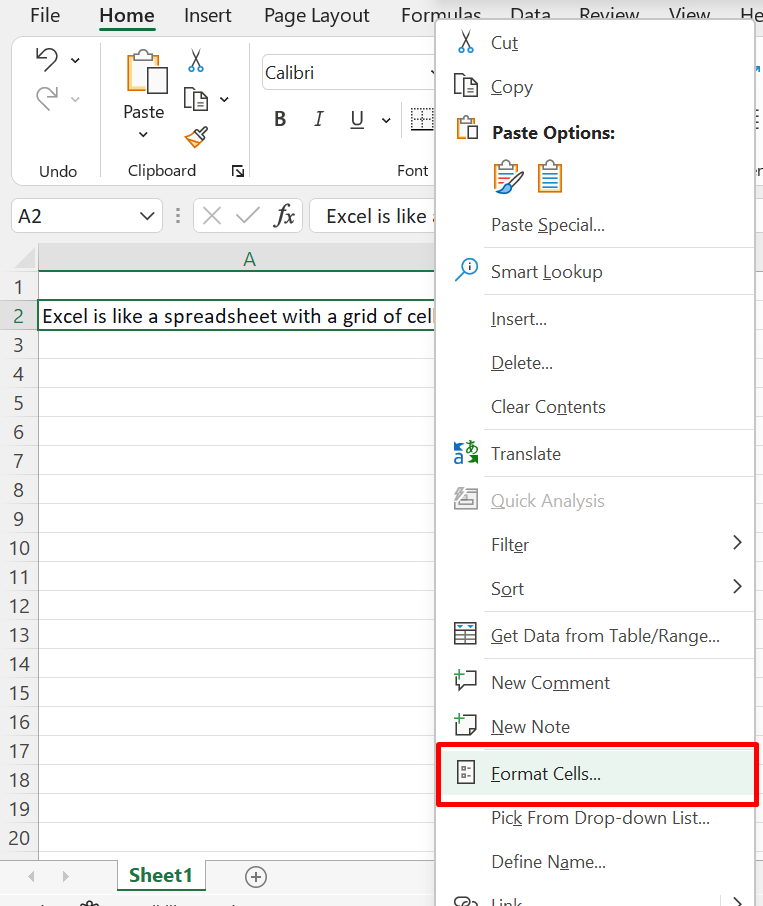
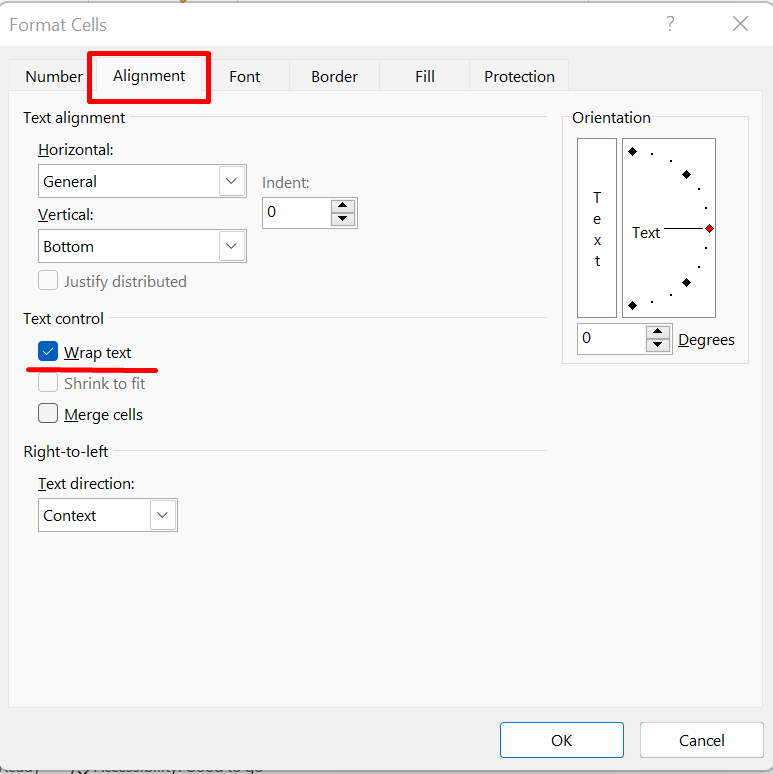
Choose the Alignment tab from the Format Cells dialog box. In the text control section, check on the Wrap text checkbox and click OK.

Format cells dialog box

You can also open this menu by selecting the cell and then right-click on it. You find the list from where you can choose the Format Cells option. Or, you can directly open the Format Cells dialog box by using the keyboard options. Press CTRL+1 and the dialog box opens.

In the Format Cells dialog box, there are also other formatting options available that you can choose and apply. You can adjust the border, font, and other modifications for the text.

Suggested Reads:

  • Excel DATEVALUE – A Step-by-Step Guide
  • How to Fix the #Div/0 Error in Excel? 2 Easy Methods
  • How to Use ISTEXT in Excel? With 3 Different Methods

Method 5: Automatically Adjust Column Width to Fit Text

You can click and drag the row width but there’s an easy option to auto-adjust the width. If the row height does not adjust to fit all the text, then you can adjust the cell width to accommodate the text. It can be done by following these steps:

  • Select the text that you wish to auto-adjust.
  • Select the Home tab.
  • Go to the Cells group.
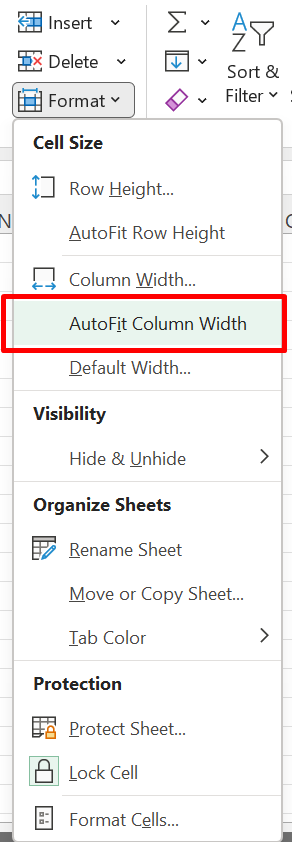
  • Click on the Format option.
Format option
Format option

In the Format option, there are options to set the row height and the column width. Choose the option AutoFit Column Width to adjust the cell width and extend it to fit the text.

AutoFit Column Width

Method 6: Manually Add Line Breaks to Wrap the Text

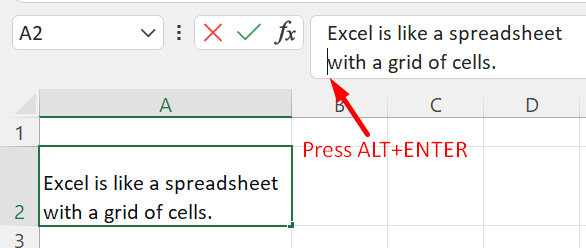
You can wrap the text in Excel to automatically fit into the cell by inserting line breaks into it. The text gets wrapped up based on the available width of the cell. You can add a line break character into the text and it will appear on two or more lines on the spreadsheet.

Select the text in the formula bar, place the cursor in the place where you want the line to break into a new line, and press ALT+ENTER.

Add line breaks
Add line breaks

Remove Formatting

The method to remove the formatting is as easy as applying it. Select the text from which you want to remove the formatting and then do any of the following methods.

  • Press the Wrap Text button again on the Home tab.
  • Go to the Format Cells menu and uncheck the Wrap text option in the Alignment tab.
  • Press the Alt -> H -> W keys on the keyboard.

Remove the Break Lines

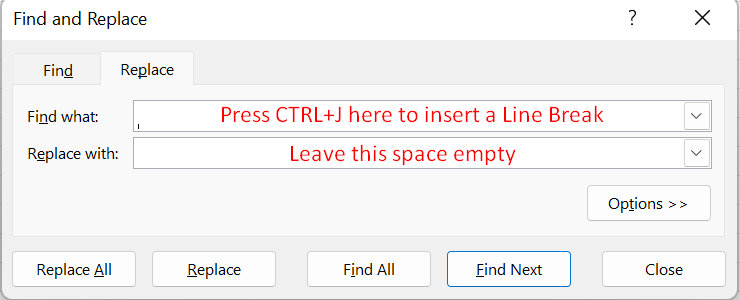
You can remove the line breaks that you have added to your text so that it wraps. You can do it by using the Find and Replace dialog box. On the spreadsheet, press CTRL+H to open the Find and Replace dialog box. 

Press CTRL+J in the Find what textbox to add a line break character. Then, leave the Replace with: textbox empty and then press the Replace All button. This removes the line break character that you have included in the text.

Remove lines breaks
Remove lines breaks

More Reads:

  • How to Use Excel Split Screen? 3 Simple Ways
  • How to Create a Venn Diagram in Excel? 2 Easy Ways
  • How to Create a Step Chart in Excel?

Closing Thoughts

The function wrap text in Excel displays a long text on multiple lines in a single cell. Wrap Text inserts a line break either automatically or manually.

In this article, we saw how to wrap text automatically in Excel when it occupies the other cells too. All the methods are explained with an example that gives a clear picture of how to work with wrapped text. You can change the row height or the column width automatically or manually.

If you need more high-quality Excel Guides, please check out our free Excel resources center. Simon Sez IT has been teaching Excel for ten years. For a low monthly fee, you can get access to 130+ IT training courses. Click here for advanced Excel courses with in-depth training modules.

Simon Calder

Chris “Simon” Calder was working as a Project Manager in IT for one of Los Angeles’ most prestigious cultural institutions, LACMA. He taught himself to use Microsoft Project from a giant textbook and hated every moment of it. Online learning was in its infancy then, but he spotted an opportunity and made an online MS Project course - the rest, as they say, is history!

Most Popular Posts

  • Kanban vs Scrum: Project Management Methodologies and Their Differences [2022]
  • How to Insert a Checkbox in Excel? 3 EASY Examples
  • How to Autofit Excel Cells? 3 Best Methods
  • XLOOKUP Google Sheets – 4 Best Alternatives!
  • Dashboards in Excel Using Pivot Tables, Pivot Charts and Slicers
  • Free Microsoft Project Training Course
  • Free Microsoft Access Tutorial for Beginners (3.5 Hours Video)
  • How to Use Blending Mode With Layers in Adobe Photoshop Elements 15

Similar Posts

How to Insert a New Worksheet in Excel? 5 Easy Ways

How to Create a Funnel Chart in Excel? 2 Useful Ways

How to Open an MPP File without Microsoft Project? 3 Best methods

How to Link and Unlink Tasks in Microsoft Project 2016

How to Subtract in Excel?- 4 Different Scenarios

How to Count Words in Word? And Know Additional Details

Course Categories

  • Adobe
  • Data Analysis
  • QuickBooks
  • Microsoft
  • Web Development
  • Work Productivity

About Us

  • About Us
  • Free Resources
  • Affiliates
  • Become an Instructor

Products

  • Pricing and Plans
  • Business Pricing
  • Government Discounts
  • Non-Profit Discounts

Support

  • FAQ’s
  • Contact Us
  • DVD support

Connect

YoutubeFacebookLinkedIn
© 2023 Simon Sez IT, Inc.
  • Terms
  • Privacy Policy
  • Sitemap
888.817.6665 Monday thru Friday 7:30 a.m. - 5:00 p.m. (ET)