Simon Sez IT

Online software training and video tutorials for Microsoft, Adobe & more

  • Course List
    • Adobe
      • Dreamweaver
        • Dreamweaver CC
        • Dreamweaver CS6
        • Dreamweaver CS5
        • Dreamweaver CS4
      • Flash
        • Flash CS5
      • InDesign
        • InDesign CS6
        • InDesign CS5
      • Photoshop
        • Photoshop CS6
        • Photoshop CS5
        • Adobe Photoshop CS4
      • Photoshop Elements
        • Photoshop Elements 2022
        • Photoshop Elements 2019
        • Photoshop Elements 2018
        • Photoshop Elements 15
        • Photoshop Elements 14
        • Photoshop Elements 13
        • Photoshop Elements 12
        • Photoshop Elements 11
        • Photoshop Elements 10
        • Photoshop Elements 9
        • Photoshop Elements 8
    • Microsoft
      • Access
        • Access 2021 Beginners
        • Access 2019
        • Access 2019 Advanced
        • Access 2016
        • Access 2016 Advanced
        • Access 2013
        • Access 2013 Advanced
        • Access 2010
        • Access 2010 Advanced
        • Access 2007
      • Excel
        • Data Analytics in Excel
        • Excel 2021 Advanced
        • Excel 2021 Intermediate
        • Excel 2021 Beginners
        • PivotTables for Beginners
        • Excel Dashboards
        • Advanced Formulas in Excel
        • Excel for Business Analysts
        • Advanced PivotTables
        • Power Pivot, Power Query and DAX in Excel
        • Excel 2019 Beginners (Mac)
        • Excel 2019 Beginners
        • Excel 2019 Advanced
        • Excel 2016 Beginners
        • Excel 2016 Intermediate
        • Excel 2016 Advanced
        • Excel 2013
        • Excel 2013 Advanced
        • Excel 2010 Beginners
        • Excel 2010 Advanced
        • Excel 2007
      • OneNote
        • OneNote Desktop and Windows 10
        • OneNote 2016
      • Outlook
        • Outlook 2021
        • Outlook 2019
        • Outlook 2016
        • Outlook 2013
        • Outlook 2010
        • Outlook 2007
      • Power Automate
        • Introduction to Power Automate
      • Power BI
        • Power BI
        • Power BI Intermediate
      • PowerPoint
        • PowerPoint 2021
        • PowerPoint 2019
        • PowerPoint 2016
        • PowerPoint 2013
        • PowerPoint 2010
        • PowerPoint 2007
      • Project
        • Project 2021 Beginners
        • Project for the Web
        • Project 2019
        • Project 2019 Advanced
        • Project 2016
        • Project 2016 Advanced
        • Project 2013
        • Project 2013 Advanced
        • Project 2010
        • Project 2010 Advanced
      • Publisher
        • Publisher 2013
      • SharePoint
        • SharePoint Online
        • SharePoint Foundation 2013
        • SharePoint Server 2013
        • SharePoint Foundation 2010
      • Teams
        • Microsoft Teams
      • VBA
        • Macros and VBA for Beginners
        • VBA for Excel
        • VBA Intermediate Training
      • Visio
        • Microsoft Visio 2019
        • Visio 2016
        • Visio 2013
        • Microsoft Visio 2010
      • Windows
        • Windows 11
        • Windows 10 (2020 Update)
        • Windows 10
        • Windows 8
        • Windows 7
        • Windows Vista
      • Word
        • Word 2021
        • Word 2019 Advanced
        • Word 2019
        • Word 2016
        • Word 2013
        • Word 2010
        • Word 2007
    • QuickBooks
      • QuickBooks
        • QuickBooks Desktop Pro 2022
        • QuickBooks Pro 2021
        • QuickBooks Online Advanced
        • QuickBooks Online
        • QuickBooks Canada
        • QuickBooks Pro 2020
        • QuickBooks 2019
        • QuickBooks 2018
        • QuickBooks Pro 2017
        • QuickBooks Pro 2016
        • QuickBooks Pro 2015
        • QuickBooks Pro 2014
        • QuickBooks Pro 2013
        • QuickBooks Pro 2012
        • QuickBooks Pro 2011
        • QuickBooks Pro 2010
        • QuickBooks Pro 2009
    • Web Development
      • AngularJs
        • AngularJS Crash Course
      • Dreamweaver
        • Dreamweaver CC
        • Dreamweaver CS6
        • Dreamweaver CS5
        • Dreamweaver CS4
      • Bootstrap
        • Bootstrap Framework
      • Html/CSS
        • HTML/CSS Crash Course
        • HTML5 Essentials
      • Python
        • Python Object-Oriented Programming
        • Pandas for Beginners
        • Introduction to Python
      • Java
        • Java for Beginners
      • JavaScript
        • JavaScript for Beginners
        • jQuery Crash Course
      • MySql
        • MySQL for Beginners
      • PHP
        • PHP for Beginners
        • Advanced PHP Programming
      • XML
        • XML Crash Course
    • Data Analysis
      • Financial Modeling
        • Financial Risk Management
        • Financial Forecasting and Modeling
      • Alteryx
        • Alteryx Advanced
        • Introduction to Alteryx
      • Power BI
        • Power BI Intermediate
        • Power BI
      • Qlik Sense
        • Qlik Sense Advanced
        • Qlik Sense
      • R Programming
        • R Programming
      • Tableau
        • Tableau Desktop Advanced
        • Tableau Desktop
      • Python
        • Python Object-Oriented Programming
        • Pandas for Beginners
        • Introduction to Python
    • Work Productivity
      • Google Sheets
        • Google Sheets for Beginners
      • Confluence
        • Introduction to Confluence
      • Monday
        • Getting Started in Monday.com
      • Asana
        • Asana for Employees and Managers
        • Introduction to Asana
      • Jira
        • Getting Started in Jira
  • For Business
  • About Us
    • Testimonials
    • Contact Us
    • FAQ
    • Membership
    • About Us
  • Pricing
  • Free Resources
  • Sign In
  • Get Started
Home > Microsoft Word > How to Track Changes in Word? A Step-by-Step Guide

How to Track Changes in Word? A Step-by-Step Guide

(Note: This guide on how to track changes in Word is suitable for all MS Word versions including Office 365)

Imagine this: You are preparing a report for an upcoming event. You share the report’s Word document with your team members since it involves a little bit of collaboration.

However, to your surprise, you notice that they have unnecessarily changed a lot of the document’s content. Now, how will you keep track of the changes that were made in the article and restore the original version?

Don’t worry! We have got you covered. In this guide, I will show you how to track changes in Microsoft Word and different ways to see the changes made to the document. 

Table Of Contents
  1. How to Track Changes in Word?
  2. How to See the Changes Made in a Document?
    • Comments
    • Markup
    • Show Markup
    • Reviewing Pane
  3. How to Accept/Reject Changes in Word?
  4. Closing Thoughts

Watch this short video to know about How to Track Changes in Word

How to Track Changes in Word?

In Word, you can easily track the changes made by you or others. As the document owner, you can also accept or reject the changes made by others.

To do this, you need to first turn on the Track Changes feature. It is very simple. Let us see how to do this.

  1. Open any Word document and click on the Review tab.
  2. Go to the Tracking section and click on Track Changes. Or, you can use the keyboard shortcut (Ctrl+Shift+E) to start tracking the changes.
How to track changes in Word?

Once the Track Changes feature is enabled, every change made by you or others will be tracked by Word.

By default, the changes you make will have a red margin on the left. This margin color will be different for different authors who make changes to the document.

Changes made will be indicated by a red margin

Turn off Tracking Changes

If you don’t want to track the changes anymore, you can easily turn it off.

Go to Review > Tracking and click on Track Changes again. Or, you can use the keyboard shortcut (Ctrl+Shift+E) to disable it.

Once you have switched off track changes, the word does not track any changes that are made. However, the previously made changes will be recorded and visible.

Related:

How to Add Page Numbers in Word? 3 Easy Examples

Footnotes in Word and Endnotes in Word

Working with Page Breaks in Microsoft Word

How to See the Changes Made in a Document?

There are different ways to see the changes made in a document. You can use any one of them based on your preferences. Let us see them one by one.

Comments

As a writer or an editor, you can leave comments to let others know about the change made, or about the change you want them to make.

To add comments to the document, select the text you want to add a comment on and click on Add Comment.

Now, type in the comment inside the comments box.

Some users prefer to add comments to indicate changes made in a document.

Click on the Show Comments option to view all comments

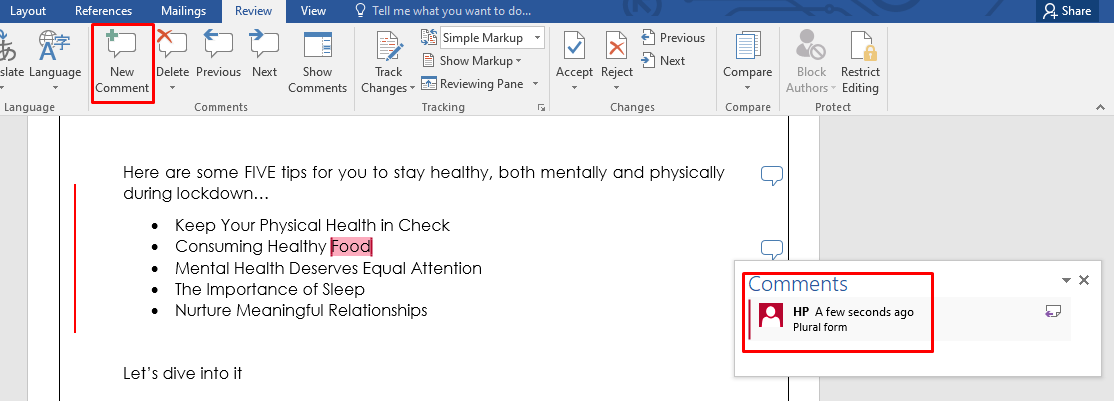
You can click on “Show Comments” to toggle on or off the visibility of the comments section. Also, you can delete or navigate between comments by clicking on Delete, Previous or Next buttons respectively.

Markup

There 4 ways to see the changes made to the document by selecting any one option from the Markup dropdown.

  • Simple Markup

The simple markup points out the changes with a red margin towards the left side of the document. It does not give much detail about the changes. It just points out the places where the changes are made

Simple Markup displays where changes were made
  • All Markup

To activate this, click on the Simple Markup drop-down and choose All Markup. It gives a detailed description of the changes. It shows all the changes made, including comments, and other details like font style and size. It also indicates newly added text with an underline and deleted text with a strikethrough.

All Markup displays all changes in detail
  • No Markup

To activate this, click on the Simple Markup dropdown and choose No Markup. Instead of indicating the places that changed or the details of the changes, No Markup simply displays the latest version with all the changes incorporated into the document. That is, it shows how the document would look after the changes are made.

No Markup displays the final version of the document when all changes are incorporated
  •  Original

The last drop-down option, the Original Markup shows the original format of the document before the Track Changes feature was switched on and changes were made. You can use this to restore the original version of the document, in case of an inadvertent error.

Original displays the original version of the document

Show Markup

In any document, there will definitely be more than one type of change/editing. However, you may be interested only in certain types of changes. (sematext) How can you track only certain kinds of changes in Word?

You can choose to see any one or more types of change made by selecting them in the Show Markup dropdown.

Here, you can toggle on or off to view the comments, formatting, insertions and deletions. Additionally, you can choose the options from the balloons to show the revisions inline or separately.

Moreover, you can also see the changes made by specific people using the show markup drop down and selecting the Specific People option.

Use Show Markup to see specific kinds of changes

Reviewing Pane

If you are an editor, or if the article has just come back from the editor, you might want to see the changes in a detailed format. The Review Pane helps you see the changes in a list view.

It provides details like the inserted text, the format of the text, the comments, and the deleted text (if any).

To see the detailed review window, just click on the Review Pane in the Review tab and choose Reviewing Pane Horizontal/Vertical. This opens up a dialog box and shows you the details of the changes, as shown below.

Use the Reviewing Pane to list all changes made
Use the Reviewing Pane to list all changes

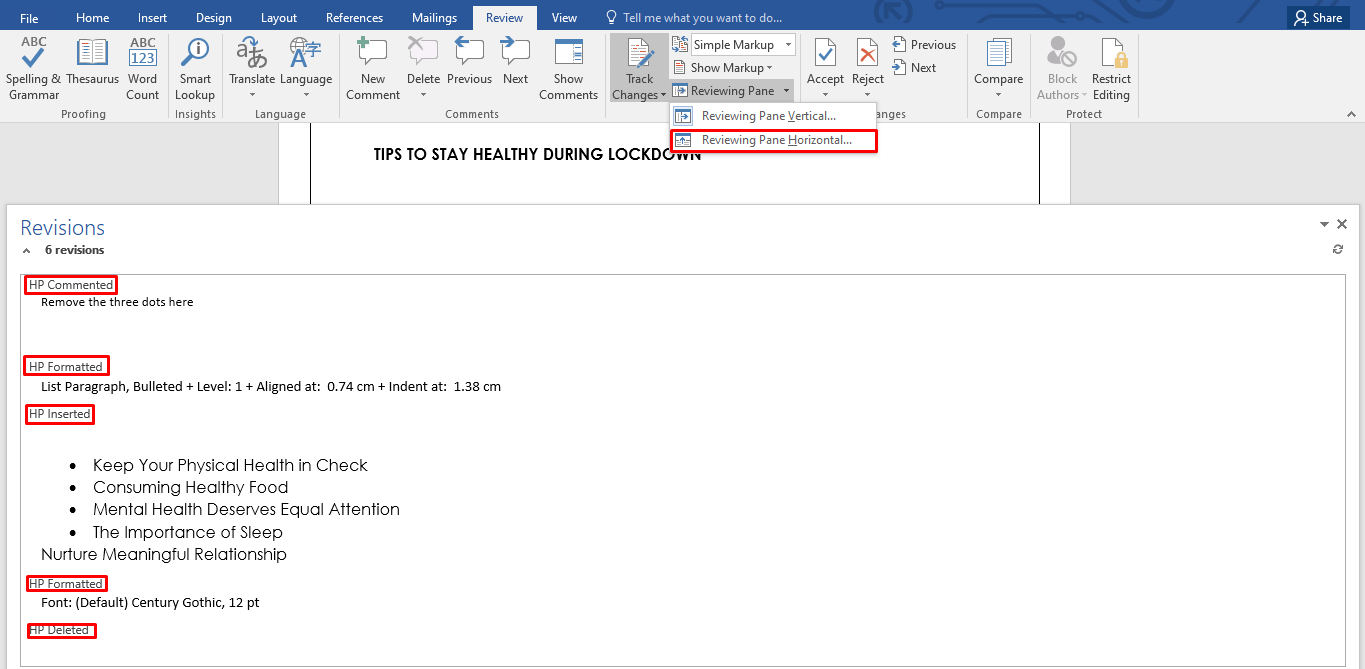
You can also place the Review Pane in a horizontal or vertical position based on your preference.

How to Accept/Reject Changes in Word?

Word doesn’t stop at keeping track of the changes made by others. It also gives you the liberty to accept or reject the changes made in the document.

To accept or reject the changes, click on the Review tab and click on Accept in the Changes section.

You can accept all the changes at once, or accept the changes one by one by clicking on the drop-down and choosing Accept All Changes. 

Accept changes
Accept / reject changes

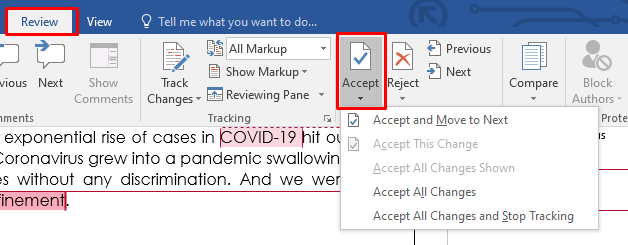
In the same way, you can also reject any changes made to the document. You can reject all the changes at once, or reject the changes one by one by clicking on the drop-down and choosing Reject All Changes.

Suggested:

How to Convert PDF to Word

How to Create a Fillable Form in Word

Using Tables in Word

Closing Thoughts

In this guide, we saw how to track changes in Word, the easy way. When you share your documents with others, tracking changes provide a fool-proof method to avoid inadvertent errors. We hope you found this helpful.

Please visit our free resources center for more high-quality guides. 

To learn Word with Simon Sez IT. Take a look at the Word courses we have available.

Simon Calder

Chris “Simon” Calder was working as a Project Manager in IT for one of Los Angeles’ most prestigious cultural institutions, LACMA. He taught himself to use Microsoft Project from a giant textbook and hated every moment of it. Online learning was in its infancy then, but he spotted an opportunity and made an online MS Project course - the rest, as they say, is history!

Most Popular Posts

  • Kanban vs Scrum: Project Management Methodologies and Their Differences [2022]
  • How to Insert a Checkbox in Excel? 3 EASY Examples
  • How to Autofit Excel Cells? 3 Best Methods
  • XLOOKUP Google Sheets – 4 Best Alternatives!
  • Dashboards in Excel Using Pivot Tables, Pivot Charts and Slicers
  • Free Microsoft Project Training Course
  • Free Microsoft Access Tutorial for Beginners (3.5 Hours Video)
  • How to Use Blending Mode With Layers in Adobe Photoshop Elements 15

Similar Posts

Using Quick Reports in QuickBooks 2019

How to Create an Excel Gauge Chart the Easy Way? 

How to Convert Excel to Word? 2 Easy Methods

How to Graph a Function in Excel? 2 Easy Ways

Introduction to QuickBooks Pro 2020

How to Protect Cells in Excel Workbooks —5 Easy Ways

Course Categories

  • Adobe
  • Data Analysis
  • QuickBooks
  • Microsoft
  • Web Development
  • Work Productivity

About Us

  • About Us
  • Free Resources
  • Affiliates
  • Become an Instructor

Products

  • Pricing and Plans
  • Business Pricing
  • Government Discounts
  • Non-Profit Discounts

Support

  • FAQ’s
  • Contact Us
  • DVD support

Connect

YoutubeFacebookLinkedIn
© 2023 Simon Sez IT, Inc.
  • Terms
  • Privacy Policy
  • Sitemap
888.817.6665 Monday thru Friday 7:30 a.m. - 5:00 p.m. (ET)