Simon Sez IT

Online software training and video tutorials for Microsoft, Adobe & more

  • Course List
    • Adobe
      • Dreamweaver
        • Dreamweaver CC
        • Dreamweaver CS6
        • Dreamweaver CS5
        • Dreamweaver CS4
      • Flash
        • Flash CS5
      • InDesign
        • InDesign CS6
        • InDesign CS5
      • Photoshop
        • Photoshop CS6
        • Photoshop CS5
        • Adobe Photoshop CS4
      • Photoshop Elements
        • Photoshop Elements 2022
        • Photoshop Elements 2019
        • Photoshop Elements 2018
        • Photoshop Elements 15
        • Photoshop Elements 14
        • Photoshop Elements 13
        • Photoshop Elements 12
        • Photoshop Elements 11
        • Photoshop Elements 10
        • Photoshop Elements 9
        • Photoshop Elements 8
    • Microsoft
      • Access
        • Access 2019
        • Access 2019 Advanced
        • Access 2016
        • Access 2016 Advanced
        • Access 2013
        • Access 2013 Advanced
        • Access 2010
        • Access 2010 Advanced
        • Access 2007
      • Excel
        • Excel 2021 Advanced
        • Excel 2021 Intermediate
        • Excel 2021 Beginners
        • PivotTables for Beginners
        • Excel Dashboards
        • Advanced Formulas in Excel
        • Excel for Business Analysts
        • Advanced PivotTables
        • Power Pivot, Power Query and DAX in Excel
        • Excel 2019 Beginners (Mac)
        • Excel 2019 Beginners
        • Excel 2019 Advanced
        • Excel 2016 Beginners
        • Excel 2016 Intermediate
        • Excel 2016 Advanced
        • Excel 2013
        • Excel 2013 Advanced
        • Excel 2010 Beginners
        • Excel 2010 Advanced
        • Excel 2007
      • OneNote
        • OneNote Desktop and Windows 10
        • OneNote 2016
      • Outlook
        • Outlook 2019
        • Outlook 2016
        • Outlook 2013
        • Outlook 2010
        • Outlook 2007
      • Power Automate
        • Introduction to Power Automate
      • PowerPoint
        • PowerPoint 2021
        • PowerPoint 2019
        • PowerPoint 2016
        • PowerPoint 2013
        • PowerPoint 2010
        • PowerPoint 2007
      • Project
        • Project 2019
        • Project 2019 Advanced
        • Project 2016
        • Project 2016 Advanced
        • Project 2013
        • Project 2013 Advanced
        • Project 2010
        • Project 2010 Advanced
      • Publisher
        • Publisher 2013
      • SharePoint
        • SharePoint Online
        • SharePoint Foundation 2013
        • SharePoint Server 2013
        • SharePoint Foundation 2010
      • Teams
        • Microsoft Teams
      • VBA
        • Macros and VBA for Beginners
        • VBA for Excel
        • VBA Intermediate Training
      • Visio
        • Microsoft Visio 2019
        • Visio 2016
        • Visio 2013
        • Microsoft Visio 2010
      • Windows
        • Windows 11
        • Windows 10 (2020 Update)
        • Windows 10
        • Windows 8
        • Windows 7
        • Windows Vista
      • Word
        • Word 2019 Advanced
        • Word 2019
        • Word 2016
        • Word 2013
        • Word 2010
        • Word 2007
    • QuickBooks
      • QuickBooks
        • QuickBooks Pro 2021
        • QuickBooks Online Advanced
        • QuickBooks Online
        • QuickBooks Canada
        • QuickBooks Pro 2020
        • QuickBooks 2019
        • QuickBooks 2018
        • QuickBooks Pro 2017
        • QuickBooks Pro 2016
        • QuickBooks Pro 2015
        • QuickBooks Pro 2014
        • QuickBooks Pro 2013
        • QuickBooks Pro 2012
        • QuickBooks Pro 2011
        • QuickBooks Pro 2010
        • QuickBooks Pro 2009
    • Web Development
      • AngularJs
        • AngularJS Crash Course
      • Dreamweaver
        • Dreamweaver CC
        • Dreamweaver CS6
        • Dreamweaver CS5
        • Dreamweaver CS4
      • Bootstrap
        • Bootstrap Framework
      • Html/CSS
        • HTML/CSS Crash Course
        • HTML5 Essentials
      • Python
        • Introduction to Python
      • Java
        • Java for Beginners
      • JavaScript
        • JavaScript for Beginners
        • jQuery Crash Course
      • MySql
        • MySQL for Beginners
      • PHP
        • PHP for Beginners
        • Advanced PHP Programming
      • XML
        • XML Crash Course
    • Data Analysis
      • Financial Modeling
        • Financial Forecasting and Modeling
      • Alteryx
        • Introduction to Alteryx
      • Power BI
        • Power BI – Beyond the Basics
        • Power BI
      • Qlik Sense
        • Qlik Sense
      • R Programming
        • R Programming
      • Tableau
        • Tableau Desktop
      • Python
        • Introduction to Python
    • Work Productivity
      • Google Sheets
        • Google Sheets for Beginners
      • Confluence
        • Introduction to Confluence
      • Monday
        • Getting Started in Monday.com
      • Asana
        • Introduction to Asana
      • Jira
        • Getting Started in Jira
  • For Business
  • About Us
    • Testimonials
    • Contact Us
    • FAQ
    • Membership
    • About Us
  • Pricing
  • Free Resources
  • Sign In
  • Sign Up
Home > Web Design > Inserting a Table in Dreamweaver CS6

Inserting a Table in Dreamweaver CS6

Synopsis: Tables have many uses on web pages. In some cases they are used to control the layout of whole pages, but mainly they are used to display content which is tabular in nature, such as schedules and financial information. In this article we look at how to insert a table.

Facebook Linkedin Twitter

In Dreamweaver CS6 there are two modes for working with tables: Standard mode and Expanded mode. Working in Standard mode means that what you see as you work on a table is a representation that is closest to how the table will actually appear on a web page. Expanded mode is used to make working with content easier. Dreamweaver adds extra spacing and padding to the cells of the table while you’re working on it to make precise or detailed work on the content easier.

In this article we are going to work in Standard mode.

To insert a table, first position the insertion point where the table is to go. Select the Insert menu then click Table. You will see the Table dialog.

Although there are several decisions to make when completing this dialog, everything can be changed later if necessary, so when you start you can make a “best guess” if you’re not sure about anything.

First of all, enter the number of (horizontal) rows and (vertical) columns. The default value for each is 3.

Now decide on the width of the table. This can be specified in pixels – the default is 200 – or as a percentage of the width of the page (or column). As usual, the danger with specifying the width as a percentage is that the table may look very different in browsers where the page width is set at very different values. With a fixed width table you will know more surely how the table will look on any browser with the width set wide enough to accommodate it.

By default, there is a border of thickness 1 between the cells. Setting this to 0 would make the border invisible. A higher value will make the border thicker.

Cell padding is a measure of the space between the content of a cell and its boundary. Cell spacing is the number of pixels between adjacent cells.

You can also specify whether the table is to have a header or not, and where that header should be.

Finally, if you enter a Caption it will appear outside the table, and the Summary text is used by screen readers as an accessibility aid.

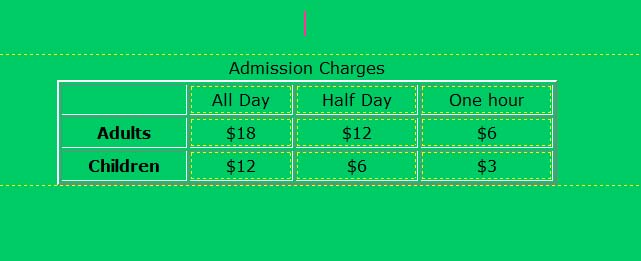
Here is my completed dialog.

Now when I click OK in the dialog the table appears on my web page and looks like this.

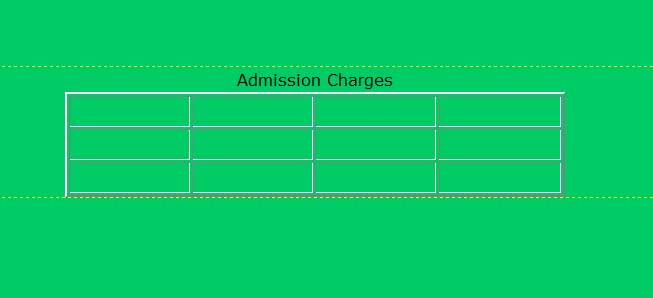
Note the Caption above and outside the table.

It is not immediately obvious that the first column is a header, but if I type some text you can see it.

Having inserted the table you can modify it in many ways, such as adding rows or columns and changing the dimensions or coloring.

Get 12 hours of Dreamweaver CS6 online training by Simon Sez IT.


Simon Calder

Chris “Simon” Calder was working as a Project Manager in IT for one of Los Angeles’ most prestigious cultural institutions, LACMA. He taught himself to use Microsoft Project from a giant textbook and hated every moment of it. Online learning was in its infancy then, but he spotted an opportunity and made an online MS Project course - the rest, as they say, is history!

30 day vertical banner

Most Popular Posts

  • How to Insert a Checkbox in Excel? 3 EASY Examples
  • How to Autofit Excel Cells? 3 Best Methods
  • XLOOKUP Google Sheets – 4 Best Alternatives!
  • Dashboards in Excel Using Pivot Tables, Pivot Charts and Slicers
  • Free Microsoft Project Training Course
  • Free Microsoft Access Tutorial for Beginners (3.5 Hours Video)
  • How to Use Blending Mode With Layers in Adobe Photoshop Elements 15
  • How to Create Charts and Graphs in Microsoft Excel 2016

START LEARNING Inserting a Table in Dreamweaver CS6 ON SIMONSEZIT.COM

START MY MEMBERSHIP

Similar Posts

How to Use the Ribbon in Microsoft Word 2013

Reconcile a Bank Account in Quickbooks Pro 2012

The Publisher 2013 Interface: Navigating the Ribbon

How to Sort a Pivot Table in Excel? 6 Best Methods

Understanding Access 2013 Relationships between Tables – Part 1

How to Add Tasks in Microsoft Project 2016

Course Categories

  • Web Development
  • QuickBooks
  • Microsoft
  • Adobe
  • Data Analysis

About Us

  • About Us
  • Free Resources
  • Affiliates
  • Become an Instructor

Products

  • Pricing and Plans
  • Business Pricing
  • Government Discounts
  • Non-Profit Discounts

Support

  • FAQ’s
  • Contact Us
  • DVD support

Connect

YoutubeFacebook
© 2022 Simon Sez IT, Inc.
  • Terms
  • Privacy Policy
888.817.6665 Monday thru Friday 7:30 a.m. - 5:00 p.m. (ET)