Simon Sez IT

Online software training and video tutorials for Microsoft, Adobe & more

  • Course List
    • Adobe
      • Dreamweaver
        • Dreamweaver CC
        • Dreamweaver CS6
        • Dreamweaver CS5
        • Dreamweaver CS4
      • Flash
        • Flash CS5
      • InDesign
        • InDesign CS6
        • InDesign CS5
      • Photoshop
        • Photoshop CS6
        • Photoshop CS5
        • Adobe Photoshop CS4
      • Photoshop Elements
        • Photoshop Elements 2022
        • Photoshop Elements 2019
        • Photoshop Elements 2018
        • Photoshop Elements 15
        • Photoshop Elements 14
        • Photoshop Elements 13
        • Photoshop Elements 12
        • Photoshop Elements 11
        • Photoshop Elements 10
        • Photoshop Elements 9
        • Photoshop Elements 8
    • Microsoft
      • Access
        • Access 2021 Beginners
        • Access 2019
        • Access 2019 Advanced
        • Access 2016
        • Access 2016 Advanced
        • Access 2013
        • Access 2013 Advanced
        • Access 2010
        • Access 2010 Advanced
        • Access 2007
      • Excel
        • Data Analytics in Excel
        • Excel 2021 Advanced
        • Excel 2021 Intermediate
        • Excel 2021 Beginners
        • PivotTables for Beginners
        • Excel Dashboards
        • Advanced Formulas in Excel
        • Excel for Business Analysts
        • Advanced PivotTables
        • Power Pivot, Power Query and DAX in Excel
        • Excel 2019 Beginners (Mac)
        • Excel 2019 Beginners
        • Excel 2019 Advanced
        • Excel 2016 Beginners
        • Excel 2016 Intermediate
        • Excel 2016 Advanced
        • Excel 2013
        • Excel 2013 Advanced
        • Excel 2010 Beginners
        • Excel 2010 Advanced
        • Excel 2007
      • OneNote
        • OneNote Desktop and Windows 10
        • OneNote 2016
      • Outlook
        • Outlook 2021
        • Outlook 2019
        • Outlook 2016
        • Outlook 2013
        • Outlook 2010
        • Outlook 2007
      • Power Automate
        • Introduction to Power Automate
      • Power BI
        • Power BI
        • Power BI Intermediate
      • PowerPoint
        • PowerPoint 2021
        • PowerPoint 2019
        • PowerPoint 2016
        • PowerPoint 2013
        • PowerPoint 2010
        • PowerPoint 2007
      • Project
        • Project 2021 Beginners
        • Project for the Web
        • Project 2019
        • Project 2019 Advanced
        • Project 2016
        • Project 2016 Advanced
        • Project 2013
        • Project 2013 Advanced
        • Project 2010
        • Project 2010 Advanced
      • Publisher
        • Publisher 2013
      • SharePoint
        • SharePoint Online
        • SharePoint Foundation 2013
        • SharePoint Server 2013
        • SharePoint Foundation 2010
      • Teams
        • Microsoft Teams
      • VBA
        • Macros and VBA for Beginners
        • VBA for Excel
        • VBA Intermediate Training
      • Visio
        • Microsoft Visio 2019
        • Visio 2016
        • Visio 2013
        • Microsoft Visio 2010
      • Windows
        • Windows 11
        • Windows 10 (2020 Update)
        • Windows 10
        • Windows 8
        • Windows 7
        • Windows Vista
      • Word
        • Word 2021
        • Word 2019 Advanced
        • Word 2019
        • Word 2016
        • Word 2013
        • Word 2010
        • Word 2007
    • QuickBooks
      • QuickBooks
        • QuickBooks Desktop Pro 2022
        • QuickBooks Pro 2021
        • QuickBooks Online Advanced
        • QuickBooks Online
        • QuickBooks Canada
        • QuickBooks Pro 2020
        • QuickBooks 2019
        • QuickBooks 2018
        • QuickBooks Pro 2017
        • QuickBooks Pro 2016
        • QuickBooks Pro 2015
        • QuickBooks Pro 2014
        • QuickBooks Pro 2013
        • QuickBooks Pro 2012
        • QuickBooks Pro 2011
        • QuickBooks Pro 2010
        • QuickBooks Pro 2009
    • Web Development
      • AngularJs
        • AngularJS Crash Course
      • Dreamweaver
        • Dreamweaver CC
        • Dreamweaver CS6
        • Dreamweaver CS5
        • Dreamweaver CS4
      • Bootstrap
        • Bootstrap Framework
      • Html/CSS
        • HTML/CSS Crash Course
        • HTML5 Essentials
      • Python
        • Python Object-Oriented Programming
        • Pandas for Beginners
        • Introduction to Python
      • Java
        • Java for Beginners
      • JavaScript
        • JavaScript for Beginners
        • jQuery Crash Course
      • MySql
        • MySQL for Beginners
      • PHP
        • PHP for Beginners
        • Advanced PHP Programming
      • XML
        • XML Crash Course
    • Data Analysis
      • Financial Modeling
        • Financial Risk Management
        • Financial Forecasting and Modeling
      • Alteryx
        • Alteryx Advanced
        • Introduction to Alteryx
      • Power BI
        • Power BI Intermediate
        • Power BI
      • Qlik Sense
        • Qlik Sense Advanced
        • Qlik Sense
      • R Programming
        • R Programming
      • Tableau
        • Tableau Desktop Advanced
        • Tableau Desktop
      • Python
        • Python Object-Oriented Programming
        • Pandas for Beginners
        • Introduction to Python
    • Work Productivity
      • Google Sheets
        • Google Sheets for Beginners
      • Confluence
        • Introduction to Confluence
      • Monday
        • Getting Started in Monday.com
      • Asana
        • Asana for Employees and Managers
        • Introduction to Asana
      • Jira
        • Getting Started in Jira
  • For Business
  • About Us
    • Testimonials
    • Contact Us
    • FAQ
    • Membership
    • About Us
  • Pricing
  • Free Resources
  • Sign In
  • Get Started
Home > QuickBooks > How to Add Vendors in QuickBooks 2018

How to Add Vendors in QuickBooks 2018

The Vendors and Suppliers page is where businesses keep track of their vendors and suppliers in QuickBooks 2018. Vendors or Suppliers are companies or people that your business pays money to, such as a subcontractor, landlord, utility, or store that you work with.

Vendor Center Set Up

The Vendor Center can be accessed in several different ways. The easiest way is to select Vendors from the Home Page. You can also choose Vendors from your icon bar, or under the menu.

Vendor Center in QuickBooks 2018

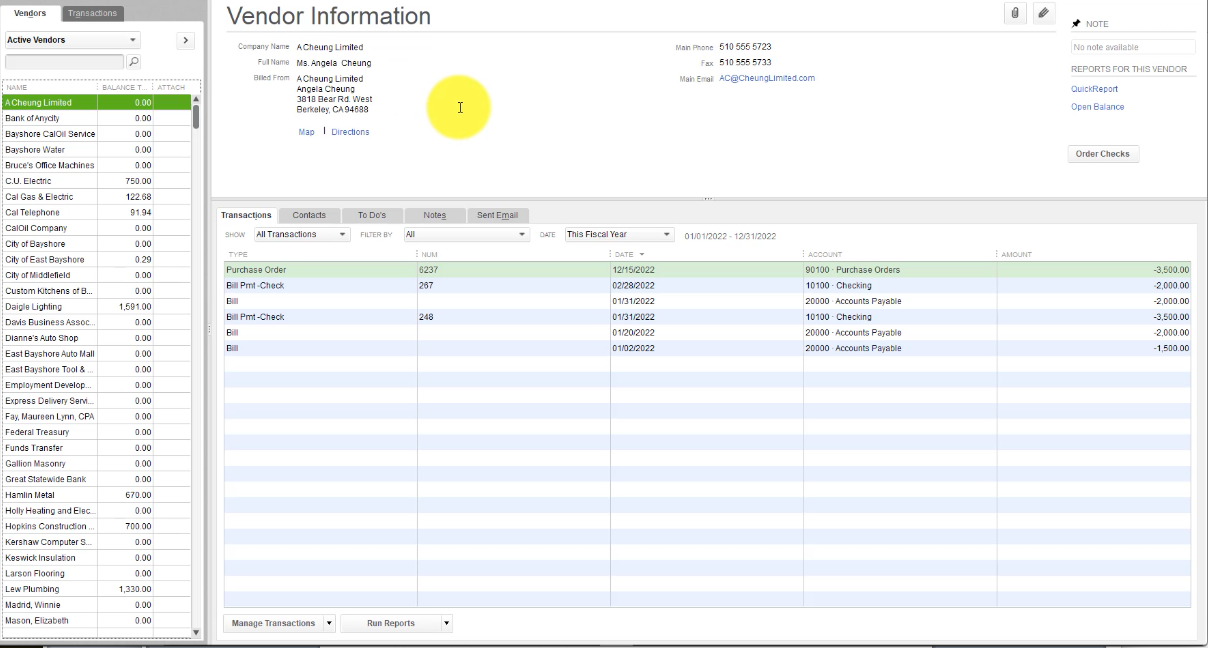
As far as how it’s set up, your Vendor Center looks just like your Customer Center. On the left side you’ll see a list of your vendors set to alphabetical order. Unlike customers, vendors will not have sublevels underneath.

Here you can see each vendor, the balance that you owe, and attached files – this could be a bill or notification you want to keep track of. You may filter through active vendors, vendors with open balances, or a custom filter you create yourself.

Select a Vendor from your vendor list to view and edit vendor information, generate reports, or add vendor notes.

Vendor List in QuickBooks 2018

Adding a New Vendor

To add a new vendor, select the button in the upper left hand corner that says New Vendor and choose New Vendor from the list. Fill in your vendor name and the rest of their information.

Need to master QuickBooks? We offer 10 courses for QuickBooks. Click here to learn more.

When you enter your vendor information, you will notice that there are five different tabs you’ll need to go through: Address Info, Payment Settings, Tax Settings, Accounts Settings, and Additional Info.

Vendor Information in QuickBooks 2018

Address Info

The more information that you fill out here, the more details Quickbooks and other programs you work with will be able to access. This is helpful for sending checks or using programs such as Microsoft Word mail merger.

Payment Settings

Enter an account number and terms provided to you by the vendor. If you are going to print checks, you can specify how the vendor would like their checks printed. You may also choose to set up credit limitations and billing rates.

Tax Settings

This tab is critical because vendors are not the same as employees. You don’t deduct any taxes from them. The vendor is responsible for sending you a bill and you are responsible for paying that bill.

If your subcontractor/vendor needs a 1099 at the end of the year, you can enter their tax ID number here.

Account Settings

You can prepopulate this tab with a couple different accounts so that each time you pay this vendor those accounts populate at the bottom of your credit card expense or check.

Additional Info

This tab is helpful for keeping track of your business’s different type of vendors. Here you can create new fields and decide if they will be used for your vendor.

Add Multiple Vendors

QuickBooks allows you to set up multiple vendors at a time. Under the New Vendor option in the left hand corner select Add Multiple Vendors.

Here you can view all of your vendors in a list format. Add multiple vendors directly onto the lines at the bottom of your list.

Adding Multiple Vendors in QuickBooks 2018

Get the complete online course for QuickBooks 2018. Click here to learn more. >>

Cindy McGuckin

Cindy McGuckin is an IT trainer with over 20 years of experience. Cindy currently manages the IT Training Department at Trident Technical College, she's a Member of the Association of IT Professionals, Charleston, SC chapter and the Treasurer of the South Carolina Association of Continuing Higher Education. Cindy is a Microsoft Office and QuickBooks expert and her online courses have received hundreds of 5-star reviews. Her no-nonsense approach to teaching complicated topics makes her classes engaging and interesting.

Most Popular Posts

  • Kanban vs Scrum: Project Management Methodologies and Their Differences [2022]
  • How to Insert a Checkbox in Excel? 3 EASY Examples
  • How to Autofit Excel Cells? 3 Best Methods
  • XLOOKUP Google Sheets – 4 Best Alternatives!
  • Dashboards in Excel Using Pivot Tables, Pivot Charts and Slicers
  • Free Microsoft Project Training Course
  • Free Microsoft Access Tutorial for Beginners (3.5 Hours Video)
  • How to Use Blending Mode With Layers in Adobe Photoshop Elements 15

MASTER QuickBooks 2018 AT SIMONSEZIT.COM

START MY MEMBERSHIP

Similar Posts

How to Add Line Numbers in Word? A Step-by-Step Guide

How to Apply a Formula to an Entire Column in Excel? 6 Ways

How to Activate the ClickUp Dark Mode – Ultimate Guide [2022]

How to Create a Pivot Table in Excel? — The Easiest guide

How to Create a Contents Page in Word

IFERROR Excel-The Ultimate Guide to Catching Errors in Excel

Course Categories

  • Adobe
  • Data Analysis
  • QuickBooks
  • Microsoft
  • Web Development
  • Work Productivity

About Us

  • About Us
  • Free Resources
  • Affiliates
  • Become an Instructor

Products

  • Pricing and Plans
  • Business Pricing
  • Government Discounts
  • Non-Profit Discounts

Support

  • FAQ’s
  • Contact Us
  • DVD support

Connect

YoutubeFacebookLinkedIn
© 2023 Simon Sez IT, Inc.
  • Terms
  • Privacy Policy
  • Sitemap
888.817.6665 Monday thru Friday 7:30 a.m. - 5:00 p.m. (ET)